The Work Space occupies the left side of the work area and gives the user information and options for tools and pattern instances.
Punching Work Space Cutting Work Space
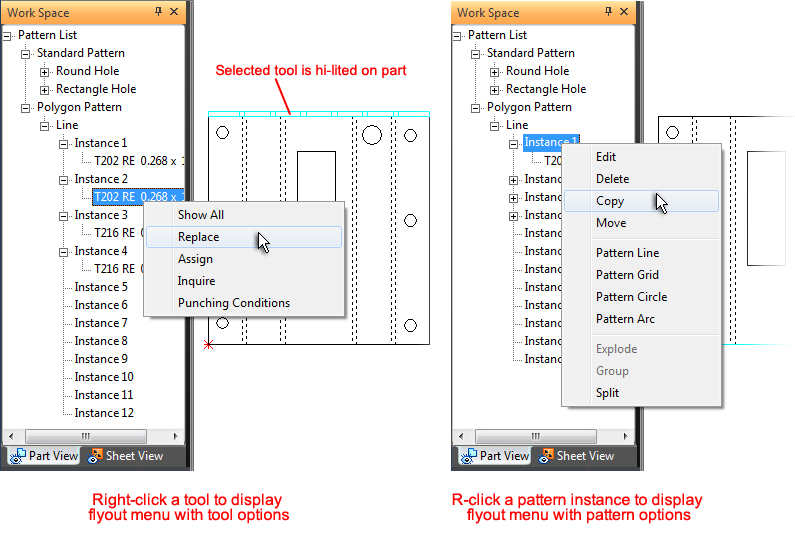
Punching Work Space
These flyout menus display when using a punching or combo machine.
Tooling Menu Options (Part View) When in the Part View tab of the Work Space, If Show All is selected, all instances of the tool will be hi-lited. Select Replace and the Tool Inventory window will open. Click a tool in the Inventory and it will instantly replace the current tool. Choose Assign to assign a tool to an untooled pattern. Click a tool in the Inventory and it will be instantly placed on the pattern. Click Inquire to show tool info. Select Punching Conditions to show punching conditions that are assigned to the tool.
|
Pattern Menu Options (Part View) Select Edit to open the Pattern Properties window to edit the pattern. Select Delete to delete the selected pattern from the part. Choose Copy and then click the pattern with the crosshair/cursor. The copy can then be place elsewhere on the part (multiple times if needed). Left-click to finalize the new location. Click Move and then click the pattern with the crosshair/cursor. The pattern can then be moved elsewhere on the part. Left-click to finalize the new location. Select Pattern Line, Grid, Circle or Arc to place the selected pattern in a line, grid, circle or arc. Choose Explode to explode a Polygon pattern and use Group to group patterns. Click Split to split a pattern into two pieces. |
|
Tooling Menu Options (Sheet View)
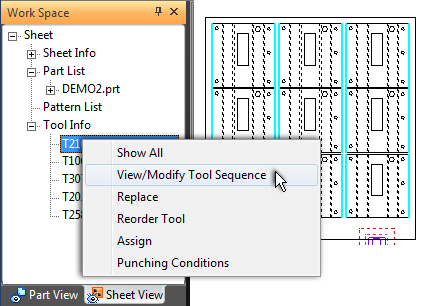
When in the Sheet tab of the Work Space, select Show All to hi-lite all instances on the sheet of the selected tool (as shown in the image above).
Choose View/Modify Tool Sequence to view and modify the tool sequence in the Tool Only Sequence window.
Select Replace and the Tool Inventory window will open. Click a tool in the Inventory and it will instantly replace the current tool.
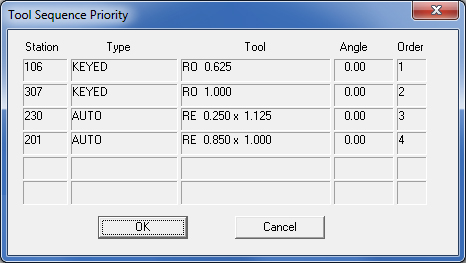
Click Reorder Tool to open the Tool Sequence Priority mini-window to change the sequence priority by clicking in the rows.
Choose Assign to open the Tool Inventory window and assign a tool to an untooled pattern. Click a part in the Inventory and it will be instantly placed on the pattern.
Select Punching Conditions to show punching conditions that are assigned to the tool.
When Re-Order Tool, is selected the Tool Sequence Priority window, which lists the current tools and sequence order, appears. The currently inquired tool will appear at the beginning of the list. Change the sequence order by clicking the items that appear in the Station, Type, Tool, Angle and Order fields.
Cutting Work Space
These flyout menus display when using a cutting machine.
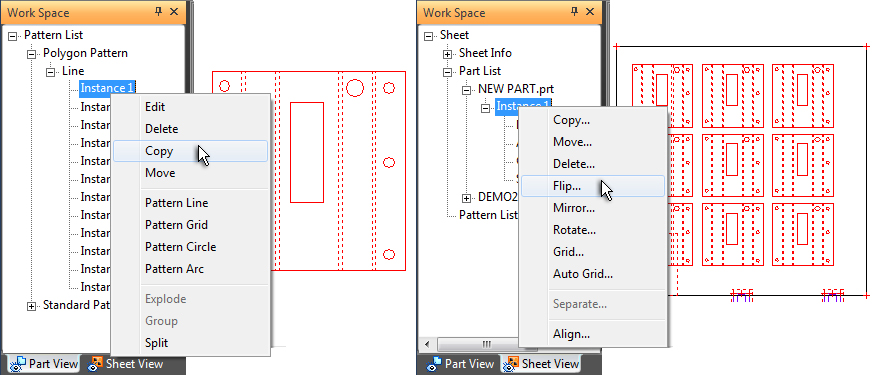
Cutting Menu Options (Part View) Select Edit to open the Pattern Properties window to edit the pattern. Select Delete to delete the selected pattern from the part. Choose Copy and then click the pattern with the crosshair/cursor. The copy can then be place elsewhere on the part (multiple times if needed). Left-click to finalize the new location. Click Move and then click the pattern with the crosshair/cursor. The pattern can then be moved elsewhere on the part. Left-click to finalize the new location. Select Pattern Line, Grid, Circle or Arc to place the selected pattern in a line, grid, circle or arc. Choose Explode to explode a Polygon pattern and use Group to group patterns. Click Split to split a pattern into two pieces.
|
Pattern Menu Options (Sheet View) Choose Copy and then click the part with the crosshair/cursor. The copy can then be place elsewhere on the part (multiple times if needed). Left-click to finalize the new location. Click Move and then click the part with the crosshair/cursor. The part can then be moved elsewhere on the part. Left-click to finalize the new location. Select Delete to delete the selected part. If parts are gridded or grouped, then all parts will be deleted. Choose Flip to flip the selected part. If parts are gridded or grouped, then all parts will be flipped. Choose Mirror to mirror the selected part. If parts are gridded or grouped, then all parts will be mirrored. Choose Rotate to rotate the selected part. If parts are gridded or grouped, then all parts will be rotated. Choose Grid to grid the selected part. If parts are gridded or grouped, then all parts will be gridded. Choose Auto Grid to auto grid the selected part. If parts are gridded or grouped, then all parts will be auto gridded. Choose Separate to separate the selected part. If parts are gridded or grouped, then all parts will be separated. Choose Align to align the selected part. If parts are gridded or grouped, then all parts will be aligned. |
|