![]()
Separate Parts (see also Separate
All Parts)
To modify a single instance of a part without affecting the remaining instances
of the same part, first use the Separate option to convert it to an individual,
stand-alone part.
Typically, when editing a single instance of a part in a group of similar parts that have been gridded or copied (using the Auto Grid, Grid or Copy options), all the instances of that part will acquire the same edit. To allow one or more of these parts to become stand-alone parts that may be edited separately, use the Separate option.
Parts must be ungridded. To ungrid previously gridded parts, click the Grid option and select Convert Grid to Individual Parts.
Note: The Separate option does not work with copied or gridded parts.
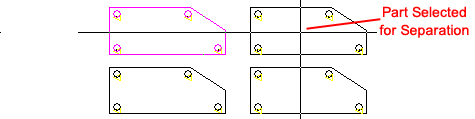
1) Select the Separate option, click the part to be separated from the others and then click again to confirm. Don't double-click - click twice.
Parts must be ungridded & ungrouped
Check if the Selected Part is Stand-alone
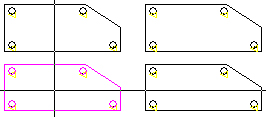
2) Using the Select option
on the same menu, click any other part.
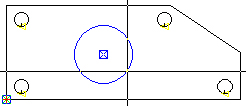
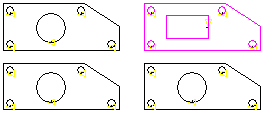
3) Go to Part View and add a new pattern to the part.
4) Return to Sheet View and only the remaining parts have the Round pattern; the separated part does not have the Round pattern.
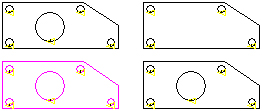
5) The separated part can itself be selected and edited without affecting the remaining parts.
Notes:
The Separate option still works with parts that are in groups, by using
Group Parts on the Sheets>Group Parts
submenu.
If a part is separated, it can be saved under a new name using the Save
As option on the File menu.
Parts automatically separate when you use the Mirror
or Flip options.
Separate All Parts
Use this option to quickly separate all parts on a sheet, that may contain
copied or gridded parts of different types.
Using this Option with a PSR
By default, when a PSR arm is assigned to a part, all similar parts will
be picked up by the same arm. This may cause the unused PSR arm (upper
or lower) to move "off the sheet" and collide with machinery
that is very near the shuttle or drop table. This option allows a user
to assign a different PSR arm to parts that are similar, but have been
nested on different edges (such as top and bottom) of the sheet.
If parts have been grouped, use the Ungroup or Ungroup All option in the Sheets>Group Parts submenu.