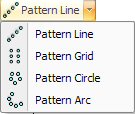
The Pattern Grid option allows you to select a pattern and duplicate it as a grid. You specify the X and Y spacing and the number of vertical and horizontal repetitions. |
Notes: |
If you want to draw the pattern grid at an angle, draw the grid, and then move into the property window and edit the angle. |
When you want to edit a pattern grid, you must select between the original pattern and the copies. You can simplify the process by enabling snap mode. When you select Edit Patterns from the Edit menu, observe whether the original pattern highlights (only the pattern is selected), or you see patterns in the grid also highlighted (the entire pattern grid is selected). To toggle between selecting the pattern and the line, move to the center point of the original pattern and click the right mouse button (Snap Mode On) or press <Tab> (Snap Mode Off). |
Example: The 4 x 6 Pattern Grid |
You want to draw a pattern grid with 0.25 radius round holes at a zero degree angle. You want the patterns to have 1-inch horizontal and vertical spacing on center. The grid is six patterns wide by four patterns high. Create a new 10 x 10 part. Draw a 0.25 radius round at 2X 2Y and type .25R. |
Select Pattern Grid and move the crosshair to highlight the round, and click the left mouse button to select it. Several copies of the pattern follow the crosshair. |
|
Click the right mouse button to snap onto the original pattern. Make sure to align the center points of both the original and duplicated patterns. The system prompts you for the spacing. Type 1S to specify a one-inch step value. Press <Right Arrow> once. Press <Up Arrow> once. Press <Enter> to accept the spacing. |
|
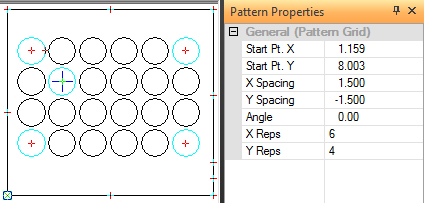
Move the crosshair and observe the values that display in the X Reps and Y Reps fields of the property window. When X Reps displays 6 and Y Reps displays 4, click the left mouse button or press <Enter>. The pattern grid appears on the part as shown below. |
|
|
Option |
Description |
General (Pattern Grid) |
|
Start Pt. X |
The X coordinate for the starting point of the Pattern Grid from the reference point of the part. |
Start Pt. Y |
The Y coordinate for the starting point of the Pattern Grid from the reference point of the part. |
New Start Point Buttons |
Click these buttons to define a new starting point for the pattern grid in the work area. |
DX |
The spacing for the grid in the X direction. |
DY |
The spacing for the grid in the Y direction. |
Angle |
The angle of the pattern grid. |
Spacing |
The number of repetitions along the X-axis. |
Reps |
The number of repetitions along the Y-axis. |
When you display the snap points for a pattern grid, you will see the snap points of the original pattern. The snap points also display on the corner patterns and on the second pattern in the second row. |
|