Users may customize the Ribbon Interface by changing icon style and placement.
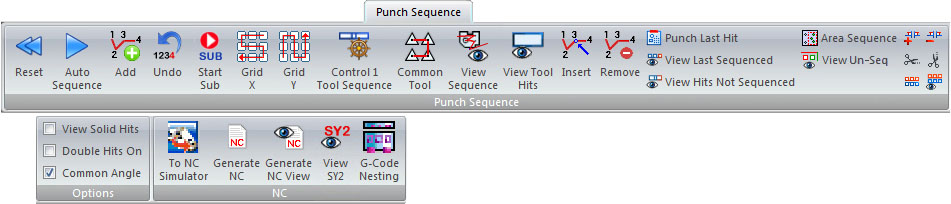
Punch Sequence Ribbon tab
Users may customize the Ribbon Interface by changing icon style and placement.
|
|
|
|
The Reset Sequence option clears any previous punch sequence.
Click for more Reset Sequence info.
|
|
The Auto Sequence option instructs the system to select the sequence for patterns assigned punching tools.
Click for more Auto Sequence info.
|
|
The Add option allows you to sequence punching patterns manually.
Click for more Add Punch Sequence info.
|
|
To reverse the last sequencing operation, select Undo.
Click for more Undo Last Punch Sequence info.
|
|
Select to start subroutines.
Click for more Starting Subroutines with Shearing Tools or Start Subroutines with Grouped Parts info.
|
|
Once you start a subroutine and choose the patterns on the first part, use Grid X to close the group and duplicate the sequence in the horizontal (X) direction.
Click for more Grid X info.
|
|
Once you start subroutine and choose the patterns on the first part, use Grid Y to close the group and duplicate the sequence in the vertical (Y) direction.
Click for more Grid Y info.
|
|
The Control One Tool Sequence option allows you to modify the sequence of a single tool. The option is only available when Sheet view is active.
Click for more Control One Tool Sequence info.
|
|
The Common Tool option allows you to automatically sequence the patterns that share the same tool.
Click for more Common Tool info.
|
|
To view the sequence, select View Sequence. The prompt instructs you to press a number key to select the viewing speed.
To allow the program to show the part unloading process as soon as the sheet is sequenced while in the Punch Sequence menu, make sure that the Auto Unloader checkbox in Machine Setting>Sequence Info is checked ON.
Click for more View Punch Sequence info.
|
|
If you want to view tool hits without suspending sequencing, select View Tool Hits.
Click for more View Tool Hits info.
|
|
The Insert option allows you to add patterns that were omitted from the punch sequence.
Click for more Insert Punch Sequence info.
|
|
The Remove option allows you to eliminate patterns from the sequence.
Click for more Remove Punch Sequence info.
|
|
This option allows you to select a part instance for sequencing the last tool hit within the current sequence group.
Click for more Punch Last Hit info.
|
|
If you want to view the last sequenced tool path, select View Last Sequenced.
Click for more View Last Sequenced info.
|
|
If you want to determine which tools are assigned to patterns but are not yet sequenced, select View Tool Hits Not Sequenced.
Click for more View Tool Hits Not Sequenced info.
|
|
The Area Sequence button allows the user to add a sequence to an area. To do so, click the icon and then drag out a rectangle in the work area on the sheet; all the patterns inside the rectangle will be added to the sequence.
Click for more Area Sequence info.
|
|
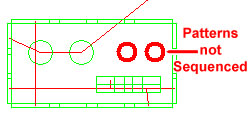
To view unsequenced patterns on a part or sheet, click the View Unsequenced Patterns icon. The pattern(s) that are unsequenced will be hi-lited in red.
When using a punching or combo machine, a pattern will remain unsequenced if a suitable tool could not be found for it when it was tooled in the Tool Assignment tab. Also try adjusting settings for Nibble Pitch and/or Die Clearance settings that may be blocking tool assignment for a pattern.
See Preferences>Tool Assignment and Tool Settings for more info on Nibble Pitch and Die Clearances. Nibble Pitch and Die Clearances can easily be toggled ON/OFF on the Toggle Toolbar in the lower right-hand corner of the AP100US program.
|
|
Select to Add Microjoint Tool Sequence.
Select to Remove Microjoint Tool Sequence.
|
|
If you have a tool in your turret that you use for trimming, you can use the Trim Horizontal and Trim Vertical options to trim the sheet.
Click for more Add Trim Sequence info.
|
|
You can instruct the system to punch a specific outside pattern within the sequence using the Flag Last Pattern to Punch option.
See more Flag Last Pattern to Punch info.
This option allows you to view all patterns having the Flag Last Pattern to Punch sequence attribute assigned to them.
See more View All Flag Patterns Punch info.
|
|
|
|
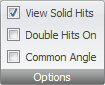
These options allow you to alter the behavior of the punch sequence.
Click for more Punch Sequence Options info.
|
|
|
|
If you have installed FabriSIM on your system, you can view a simulation before actually transmitting the NC code to your machine.
Click for more Send to NC Simulator info.
|
|
Click Generate NC to generate the code, or Generate NC View to generate the code and view it in the NC Sequence Viewer. Such files are saved in the NCFiles folder in the AP100US installed folder and can be viewed later in WordPad or Notepad.
Note: This step is usually taken after the sheet is finalized, sequenced and the part unloading sequence has been completed. Also, generating the NC file automatically generates the SY2 file required by the Automation Simulator.
Click for more Generate NC and Generate NC View info.
Note: When saving files, Part Name should be less than 32 characters. If the name exceeds this limitation, AP100US will automatically shorten the name.
|
|
SY2 code allows the user to view positional data for part remover arms. It is auto-generated when the user clicks on Generate NC or Generate NC View and saved in the NCFiles folder. When this option is clicked, the file opens in WordPad; saved SY2 files can also be opened later in Notepad.
Note: This driver-dependent option appears only when using newer Amada machines.
|
|
Select to create a GTM or LMT file for G-Code Nesting.
Click for more G-Code Nesting Integration info.
|