The placement of the icons and the overall Ribbon style can be customized to suit the user. Any changes made are auto-saved and usable during the current working session in the AP100US program; no relaunch required. The Ribbon can also be reset to its original arrangement.
Add Icon to Quick Access Toolbar
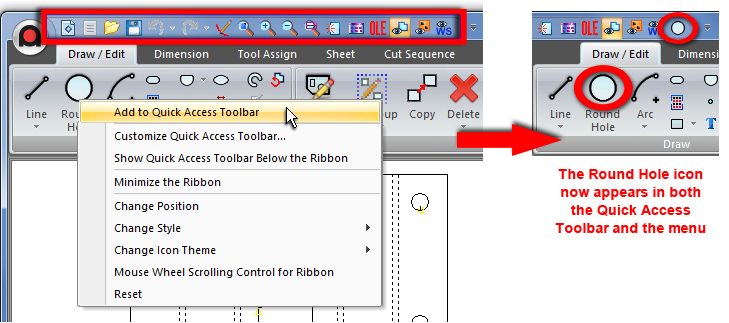
The user may add one or more icons to the Quick Access Toolbar, which is indicated in this image. Right-click the icon to be added to the Toolbar (such as Round Hole) and the flyout menu displays. Left-click Add to Quick Access Toolbar and that icon is added to the Toolbar.
To remove any
icon from the toolbar, right-click anywhere on any menu and then choose
Reset.
Clicking Reset will reset ALL icon changes made to ALL Ribbon tabs in the
interface, regardless of where or when they were done.
Note: When using the Customize option, the only clickable areas are directly on icons (shows the Add to Quick Access Toolbar option), or on the gray title bar that underlines each sub-menu on each tab.
The Customize window may also be used to undo certain changes made to the Quick Access Toolbar. See Customize the Toolbar for more info.
For info on The Customize Quick Access Toolbar, Show Quick Access Toolbar Below the Ribbon and Minimize the Ribbon options, please see Ribbon Interface>Quick Access Toolbar.
Change Position
This option allows the user to manually move an icon to any other location on the same Ribbon tab.
How it Works
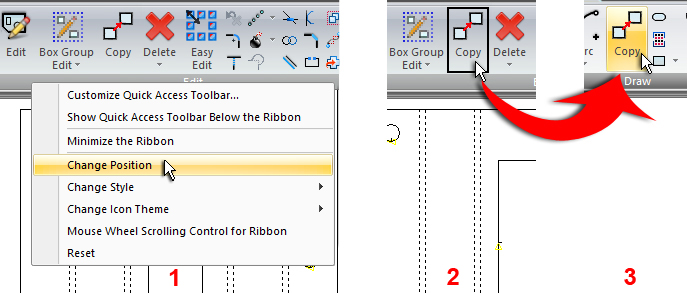
Right-click on any icon or title bar and (1) choose Change Position from the flyout menu. Then (2) left-click the icon to be relocated, hold down the mouse button and drag the icon to the new location on that same ribbon tab (including any sub-menu). (3) Releasing the mouse button places the icon in the new location. An icon may be moved repeatedly.
To remove an icon completely from a ribbon menu, click Change Position, left-click and drag the icon out of the interface and then release the mouse button. If all icons in a submenu are removed, the submenu itself still remains.
Note: This procedure must be repeated each time an icon is moved.
Click Reset to return icons to their original location. This option will reset ALL icon changes made to each Ribbon tab in the interface, regardless of where or when they were done.
Change Style
AP100US offers three icon styles as shown here -

Right click directly on the icon to be changed (such as Auto Part Define) and select a style. Style 1 (default) is IconWithCaptionBelow. Style 2 is IconOnly and Style 3 is IconWithCaption.
Style of an individual icon can be changed repeatedly. Selecting Reset will also reset ALL Style changes, regardless of when and where they were made.
Note: The style of icons that are small by default can also be changed.
Change Icon Theme
AP100US offers two icon themes. The default Modern Theme with larger icons is shown here -
![]()
![]()
Here are the same two submenus
shown in the Classic Theme
When the Theme is changed in one Ribbon Tab, it will be applied to ALL Ribbon Tabs.
To return to the previous Icon Theme, repeat the above process.