Add Microjoint
Tool Sequence
 The Add
Microjoint Tool Sequence option allows the order of the bridge
microjoint tool hits in the sequence to be specified. The option is only
available if you have specified the use of bridge tools to create the
microjoints. See Place Microjoint,
Edit Microjoint
and Microjoint Window
in Sequence Features
for more info.
The Add
Microjoint Tool Sequence option allows the order of the bridge
microjoint tool hits in the sequence to be specified. The option is only
available if you have specified the use of bridge tools to create the
microjoints. See Place Microjoint,
Edit Microjoint
and Microjoint Window
in Sequence Features
for more info.
Before you
attempt to use this option, open the Turret
window and make sure that a tool has been designated as a microjoint
tool. See Punching Microjoints
Panel for info on how to designate a tool as a microjoint tool.
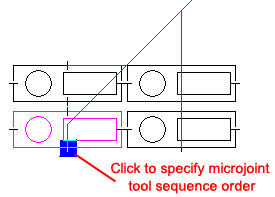
To
specify the order of the bridge microjoint tool hits in the sequence,
switch to Sheet view. If necessary, use the Zoom options on the View menu
to magnify the view. Select Add Microjoint Tool Sequence and the
pointer bounces between those microjoints that have bridge tool assignments.
Move the pointer onto the microjoint of choice and click. The punching
direction arrows appear on the path and the bridge microjoint appears
in the Pattern Sequenced color (Color
Parameters/Preferences window).
Note:
This is a manual method for controlling the sequence. The user may also
automatically control the tooling sequence by sequence priority options.
(See Tool
Sequence Priority window for more info.)
Remove Microjoint Tool Sequence
 The Remove Microjoint Tool
Sequence option is only available if you have specified the use of bridge
tools to create the microjoints. You would use this command to remove
any bridge microjoint tool hits from the sequence. The option will remain
active until you select another command. See Edit
Microjoint, Microjoint
Window and Delete
Microjoint in Sequence
Features for more info.
The Remove Microjoint Tool
Sequence option is only available if you have specified the use of bridge
tools to create the microjoints. You would use this command to remove
any bridge microjoint tool hits from the sequence. The option will remain
active until you select another command. See Edit
Microjoint, Microjoint
Window and Delete
Microjoint in Sequence
Features for more info.
To
remove a bridge microjoint tool hit from the sequence, switch to Sheet
view. If necessary, use the Zoom options on the View menu to magnify the
view. Select Remove Microjoint Tool Sequence and the pointer bounces
between those microjoint tool hits that have been added to the sequence.
Move the pointer onto the microjoint to be removed and click. The punching
direction arrows on the path and the tool hit will revert to the Tool
Hit/Cutting Direction color (Color
Parameters/Preferences window).
Note:
This is a manual method for controlling the sequence. The user may also
automatically control the tooling sequence by sequence priority options.(See
Tool
Sequence Priority window for more info.)