![]() In Edit Layout the user
may make changes to individual sheets in a job nested in the Sheet Wizard.
Current sheets may be deleted, existing sheets may be inserted or entirely
new sheets added. A job is pushed to Edit Layout after nesting in the
Sheet Wizard is completed. The Edit Layout
panel may be bypassed by checking OFF the Edit
Sheet Layout / Schedule List Page checkbox in Sheet
Wizard>Settings>Advanced Settings.
In Edit Layout the user
may make changes to individual sheets in a job nested in the Sheet Wizard.
Current sheets may be deleted, existing sheets may be inserted or entirely
new sheets added. A job is pushed to Edit Layout after nesting in the
Sheet Wizard is completed. The Edit Layout
panel may be bypassed by checking OFF the Edit
Sheet Layout / Schedule List Page checkbox in Sheet
Wizard>Settings>Advanced Settings.
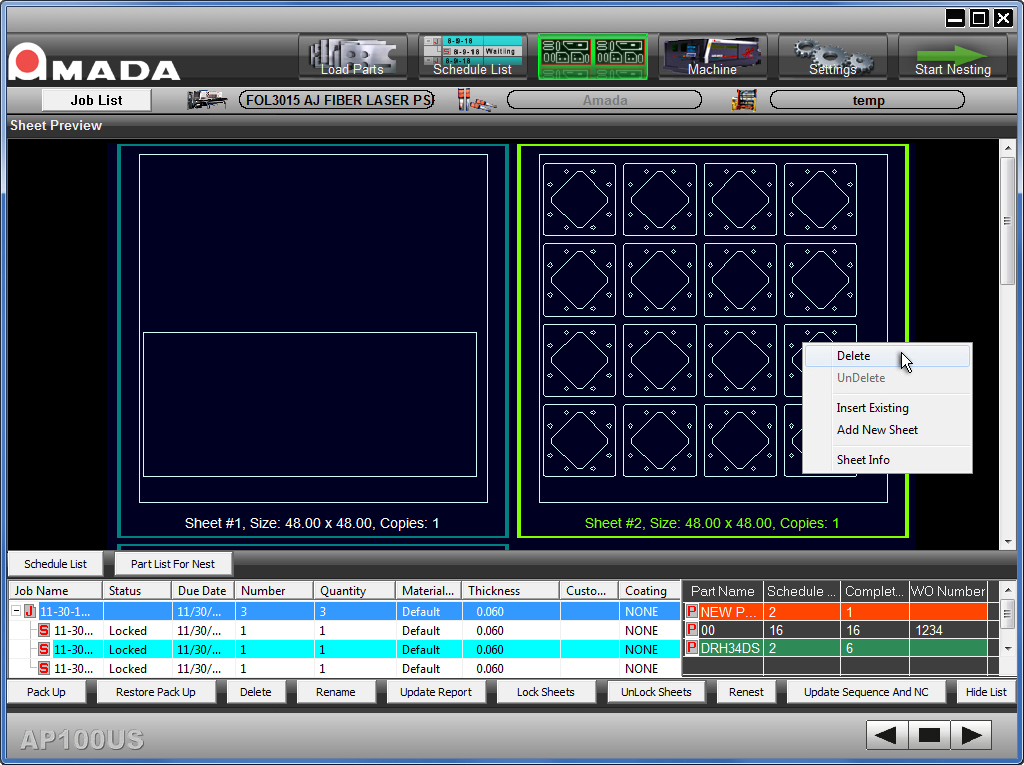
The selected sheet (in green) will be deleted from the job
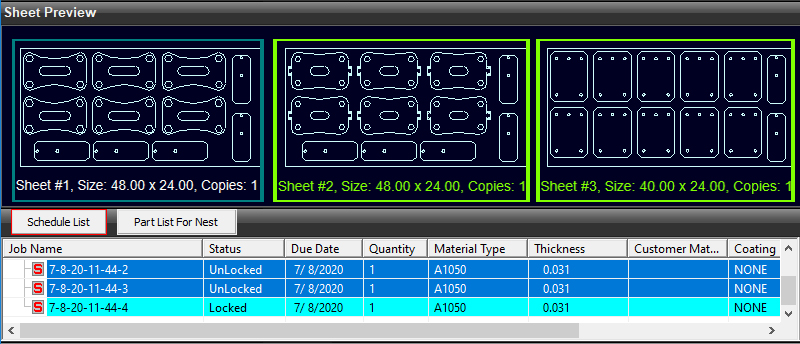
Sheet Preview
This panel displays all the sheets from the job that is currently selected
in Edit Layout. The view may be scrolled to view multiple sheets.
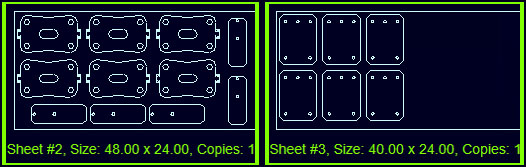
Right-click a sheet to open the flyout menu, shown in the above image. A sheet may be deleted, then returned to the job by clicking UnDelete. Click on Insert Existing to open the C:\AP100US\SHEETS folder to add other sheets to the selected job. (Such sheets appear as the last sheet.) Select Add New Sheet, enter sheet size in the dialog and click OK to open a blank sheet. Double-click the blank sheet to open it in the AP100US Work Area, where parts can be placed on the sheet.
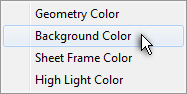
To edit colors used in the preview, right-click an empty spot on the left side of the preview area to open the edit color flyout menu.
Schedule List Columns
When the Edit Layout panel opens, the Schedule List will be in view.
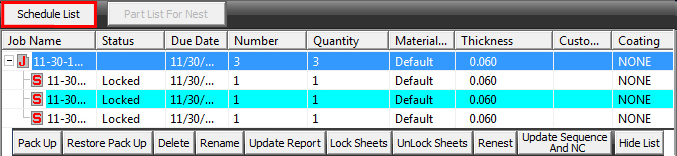
| Job Name | A job name is generated (and saved to C:\AP100US\SWJOBS) when parts in the list are nested. To rename a job select the file in Edit Layout and click the Rename button. |
| Status | This column shows if the sheet has been Locked or Unlocked. A locked sheet cannot be renested, meaning that the NC Code cannot be updated. |
| Due Date | Due Date is the original nesting date assigned to the job by the program. |
| Number | Quantity of unique sheets that are in the job. |
| Quantity | Quantity of all sheets in the job, including repetitions. |
| Material Type | The Default material appears here if no other material type was chosen by the user. |
| Thickness | The thickness of the material, which is drawn from the material used in the job. |
| Customer Material Type | Type of material is assigned by the customer. |
| Coating | Protective coating used on the material. FLP (Fiber Laser Plate) for material made for use with a fiber laser machine, PVC protective surface coating or 2 SD for two-sided PVC coating. |
| Material File Name | Name of material is assigned by the customer. |
Schedule List Function Buttons
Pack Up / Restore Pack Up
Hi-lite a ![]() job row and then click the button to zip up all files pertaining to the
job so they may be sent to Amada Support. For full details see The
Help Menu>Pack Up Files.
job row and then click the button to zip up all files pertaining to the
job so they may be sent to Amada Support. For full details see The
Help Menu>Pack Up Files.
Previously packed up files may be restored to the Schedule List by hitting
Restore Pack Up. Such files must still be in the C:\AP100Us\SupportFiles\
folder.
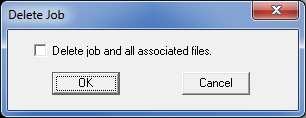
Delete
Click to delete a selected job file. This option allows the user to remove
the job from the Edit Layout panel, or delete the job and all files from
the AP100US installed folder.
Rename
Click to rename the selected job by entering text into the dialog that
displays.
Update Report
Click to update the printable report for a job that has been changed (sheets
deleted or inserted, etc.).
Lock Sheets / Unlock Sheets
By default all sheets - ![]() - are Locked. A locked sheet
can be edited (by double-clicking to open it in the AP100US work area)
and saved, but it cannot be renested, meaning that the NC Code for the
job cannot be updated. To allow the NC Code to be updated, a sheet must
be unlocked by clicking the sheet in the Preview area. When a sheet is
selected, the outline and text will turn bright green and its status will
be "Unlocked."
- are Locked. A locked sheet
can be edited (by double-clicking to open it in the AP100US work area)
and saved, but it cannot be renested, meaning that the NC Code for the
job cannot be updated. To allow the NC Code to be updated, a sheet must
be unlocked by clicking the sheet in the Preview area. When a sheet is
selected, the outline and text will turn bright green and its status will
be "Unlocked."
If a selected sheet is unlocked, clicking another sheet will cause the first sheet to default to Locked status. Select multiple sheets by ctrl + clicking.
Notice in the Schedule List>Status
column, sheets 2 and 3 (hi-lited) have been unlocked and can be updated
To unlock sheets, the user may also select sheets in the Schedule List, right-click to open the flyout menu and select Unlock Sheets.

Renest
Click to renest a job that has been changed (a sheet or sheets edited,
deleted or inserted, etc.). Be sure to unlock a sheet that has been altered
to allow NC Code generation.
Update Sequence and NC
Click to resequence and regenerate NC code. This option is useful if changes
are made to a job directly in the Edit Layout panel. If this button is
not available, be sure the With Sequence
and Code Generation option is selected in the Sheet
Wizard>Settings page.
Hide List
To hide the Schedule List select this option.
When the Parts List for Nest button is clicked, the user will see this view that contains part-specific information. Certain columns here are editable to allow the user to make last-minute changes.

In
large jobs with many sheets, if a particular part does not appear in the
Parts List for Nest,
go back to the Schedule List, highlight the sheet that contains that part
and then return to the Parts List for Nest.
Part Name |
Displays the name given to the part when it was created. This information is read from the part file. Cells in this column are read-only. |
| Part Size | Displays the size of the part. This information is read from the part file. Cells in this column are read-only. |
Work Order Number |
The Work Order number assigned to the part. This number may have been already saved with the part before it was added to the Parts List, or the number may be added in the Parts List, or directly into the cell by double-clicking to activate. |
| Material Type | Displays the type of material. This information is read from the part file. Cells in this column are read-only. |
| Thickness | When .prt files are added they will automatically have the default thickness as selected in the Material Type pull-down; however, if no thickness is specified it will use the default thickness as selected in the Material Type pull-down. Cells in this column are read-only. |
| Schedule Number
|
This column shows the number or quantity of parts that were originally scheduled to be nested in the Parts List for Nesting. This value may be edited directly in the cell by double-clicking to activate. If the sheet is edited in AP100US and parts are added or removed, the Schedule Number quantity will remain the same until manually changed by the user. |
| Complete Number | This column shows the number or quantity of parts that were actually nested when the job was processed. Part shortfalls may occur, for example, if the required quantity of material is not available. Part surpluses may occur after a sheet was edited in AP100US and more parts were added. |
| Filler Number | When the user enters a value here the system will allow that part to be used to fill open spaces on the sheet(s). For example, if 10 is entered and if there is sufficient unused space on the sheet(s) that were selected, the system will nest all 10 parts. Note: The Filler Number column in the Add Parts panel and the Filler Number column here in Edit Layout are not linked – they work independently from one another. |
| Due Date | This is the Due Date that was entered in the Load Parts panel. Cells in this column are read-only. |
| Rotation | Rotation for a part may be assigned or edited here. Double-click the cell and select Yes or No. |
| Common Cutting | Common Cutting for a part may be assigned or edited here. Double-click the cell and select Yes or No. |
| Revision | Read-only entries in this column have been assigned to the part in the AP100US Sheet Info>Parts List panel or Sheet Properties panel. |
Parts List for Nest Function Buttons
Select All / Unselect All
An active ![]() sign indicates that a part is selected for
processing. (By default all parts are selected for processing.) When clicking
the Start Nesting button to renest
the parts the user may unselect single parts by clicking the
sign indicates that a part is selected for
processing. (By default all parts are selected for processing.) When clicking
the Start Nesting button to renest
the parts the user may unselect single parts by clicking the ![]() sign, to prevent them from
being renested. To Unselect all parts click the Unselect All button. Likewise,
when the Select All button becomes active, it may be selected to re-select
all parts for processing.
sign, to prevent them from
being renested. To Unselect all parts click the Unselect All button. Likewise,
when the Select All button becomes active, it may be selected to re-select
all parts for processing.
Select / Unselect
In the same manner the user may unselect a specific part by highlighting
the part and then clicking Unselect. Ctrl+click to select two or more
parts. Unselected parts may be re-selected.
Add Part / Remove Part
Clicking the Add Part button opens the Open
part window. Select a part or parts in the usual manner, click Open
and then Close the window. To remove a part or parts, hi-lite the part(s)
and then click the Remove Part button to completely remove the part(s)
from the Parts List and nesting job.
Start Nesting
To renest the sheets after the scheduled number has been increased (that
is, parts have been added), click the Start Nesting button. The sheet(s)
will be updated according to the latest changes. The sheet(s)
Adding
Parts & Re-nesting
When one or more parts have been added to the Parts List and Start Nesting
is clicked, the system will automatically push the added parts to a new
sheet. This happens regardless of how much free space is available on
the existing sheet(s). To have the added parts placed on existing sheets,
the user must select a sheet or multiple sheets (using ctrl+click). When
this is done, new parts will be placed in open spaces on existing sheets
and if there isn't enough space on the sheets for all of the scheduled
parts, the system will automatically create a new sheet and push the remaining
added parts to that sheet.
Two sheets have been Ctrl + Selected
Added parts will be nested on the second
sheet
Part Production info

| Part Name | This is the original name of the part when it was loaded into the Sheet Wizard Parts List for Nesting. |
| Schedule Number | This column shows the number or quantity of parts that were originally scheduled to be nested in the Parts List for Nesting. This value may be edited directly in the cell by double-clicking to activate. This quantity may need to be updated if, for example, the sheet/job was edited in AP100US and more parts were added. |
| Complete Number | This column shows the number or quantity of parts that were actually nested when the job was processed. Part shortfalls may occur, for example, if the required quantity of material is not available. Part surpluses may occur after a sheet was edited and more parts were added. |
| WO Number | The Work Order number assigned to the part. This number may have been already saved with the part before it was added to the Parts List, or the number may be added in the Parts List, or directly into the cell by double-clicking to activate. |
See Editing a Sheet in the AP100US Work Area below for more info.
Editing
a Sheet in the AP100US Work Area
Double-clicking a sheet will open it in the AP100US work area for editing. The floating Sheet / Job Edit window (shown here) will display with thumbnails of the parts from the current job. Select a different sheet for editing from the Sheet Name list if needed. Make changes to the sheet in the work area by using options in the Sheet tab such as Nest.
Another way to add more parts is by adding an additional empty sheet (while in Edit Layout), double-clicking that sheet to open it in the AP100US work area and then manually dragging in parts from the Sheet / Job Edit panel. This is useful for parts (such as the "#3 Lead in Pierce demo" part colored in orange) that have production shortfalls. The user may also use the Open File icon in the Quick Access Toolbar to manually add parts to any sheet.
After editing click Update and then Close to return to the Sheet Wizard. Check ON the Auto Sequence and Generate NC Code checkbox to resequence and regenerate NC code for the job.
Production Adjustments
In the part view each part is shown with its quantity as it was scheduled
in the Parts List for Nesting
and the final quantity that was actually nested. For example, part "#2 Door
Stop Hem" is marked in green to show a production surplus - 6 parts
were scheduled, but 7 parts were finally nested. "#3: Lead in Pierce
demo" was set to have a quantity of "8" to be nested in
the job, but only "4" parts were nested, so the part is marked
in orange to show a production shortfall.
Such production adjustments could be due to last minute changes made by the operator who removed or added parts to the sheet, or to a shortage of material in the Material Library.
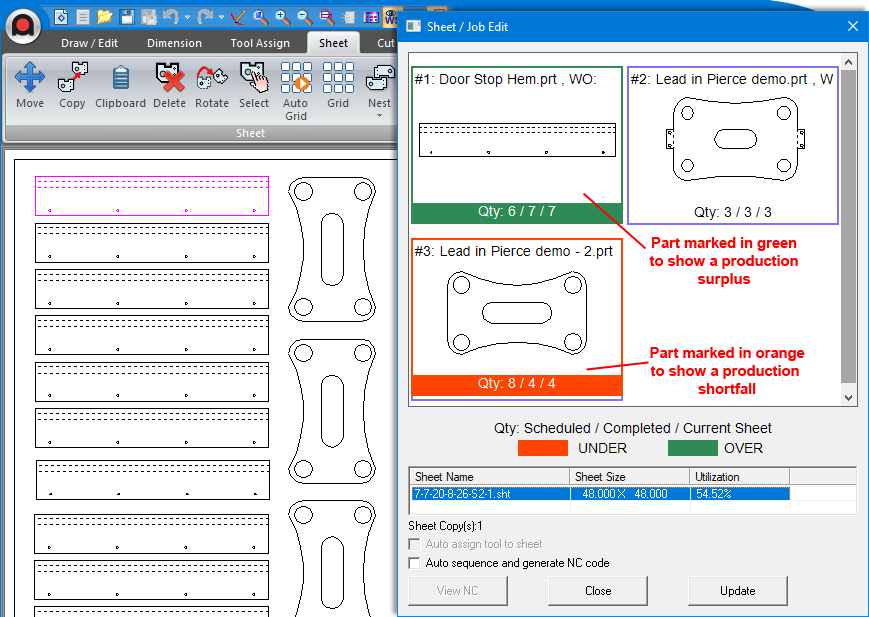
Every Sheet in the Job along with Size and %Utilization is listed in the view
Option |
Description |
|
Click the Back Arrow to return to the main Sheet Wizard Load Parts panel. |
|
Click the Forward Arrow to advance to the next panel (most likely the Start Nesting>Results window). |
|
Click the Square to cancel the nesting operation and return to the main AP100US program interface. (Nesting that has been completed up to this point will be visible in the AP100US work area.) |