![]()
Click to open the Schedule List to monitor material usage and job status for "active" jobs that are being processed (or have already been processed) by machines on the factory floor. Information given in the List allows parameters such as skeleton usage to be managed.
Push a job to the Schedule List by hitting the Commit icon either on the Modules>Wizard submenu, the Sheet Wizard>Start Nesting>Nesting Results panel, or on the Main File (Amada A) menu. To have each nesting job automatically committed to the Schedule List, check ON the Auto Commit to Schedule List option on the Settings>Advanced Settings panel.
When opened the Schedule List will float on top of other programs (including AP100US/Sheet Wizard) to allow the user to continuously monitor job status in real time. The list must be closed manually.
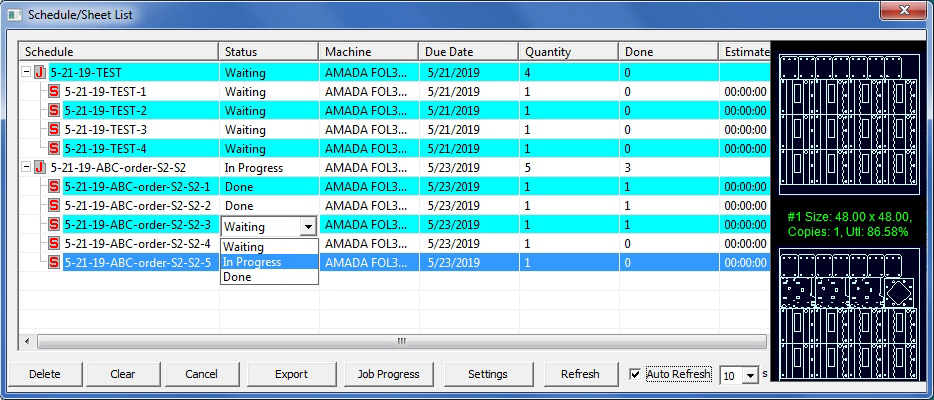
Select a sheet row or job row to show
thumbnails of all sheets in that job
Almost all of the columns contain read-only information, that was either previously entered/edited by the user, or was generated by the machine during processing and then sent to the Schedule List.
Column Headers
Schedule
This name is pulled from the Sheet
Wizard>Layout Setting>Job Name and is auto-assigned to the job.
This name can be changed by the user in the Sheet Wizard.
Status
Waiting: The job is waiting
to be processed on a machine. In
Progress: The job is currently being processed. Done:
The job has been completed. Although this value is auto-updated by the
system, the user may change the status manually by making a selection
from the pull-down menu.

Progress
This column shows the completion progress
for the job.
Machine
The machine that was selected for this
job. Machines are typically assigned to jobs either in the Machine>Description panel as the
default machine, or in the Sheet Wizard>Machine,
Tool Inventory & Material panel.
Skeleton/Remnant Name
The option to create skeletons must be enabled in Machine
Setting>Sheet Layout Info. During processing the Sheet Wizard will
auto-create skeletons as needed; skeletons created for a specific material
are viewable in the Material Library.
Shelf No
The shelf number in the material tower that has been assigned to the job
by the operator.
Due Date
The date when the job is expected to be completed. This info is drawn from
the Due Date column in the Sheet
Wizard>Parts List for Nesting.
Completion Time
The time the job is actually completed.
Quantity
The overall number of sheets in the job after the job has been nested in
the Sheet Wizard.
Done
The actual quantity of sheets that were processed in the machine.
Estimated Time
The estimated time it will take to process the job. After a job has been
nested, this value is pulled from the Run Time given in the Sheet
Wizard>Results window. Generation of a Run Time that can be used
by the Schedule List must be switched ON in Sheet
Wizard>Settings>Report Settings.
Real Time
The actual time it took to process the job.
Utilization
The amount of material (sheets) that was fully utilized during processing.
Function Buttons
Click Delete to delete selected jobs from the list, click Clear to remove all jobs from the list and click Cancel to close the Schedule List without saving any changes.
Export Option in Schedule List
An Export option is added to the Schedule List to allow CSV/XLS format
files to be exported with Quantity and Total Time attached.
Job Progress
Click to open the Job Progress window that shows real-time, up to the second
status info for work orders in the Schedule List.
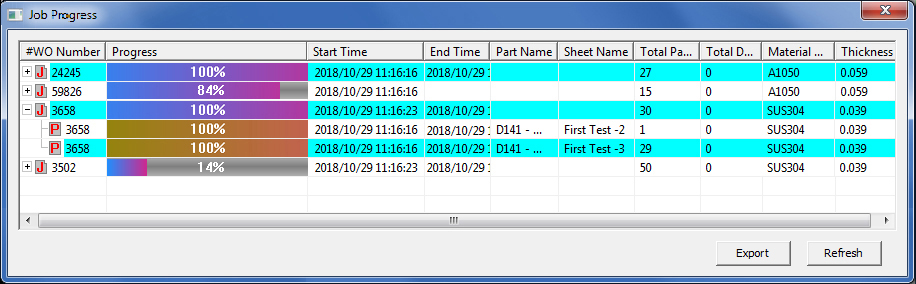
The progress of a job that has been forwarded to machines on the shop floor is indicated in the Progress column. This real-time data is obtained when AP100US sends a query to the machine controller for this info. A job is tracked by its Work Order number, which is shown in the first column.
Export
to XLS, CSV or TXT file
Click the Export button to export all jobs in the view to a file. By default
these file are saved to the C:\AP100US\ASSEMBLIES folder.
For more info see Using
the XLS option.
MRP
Tracking
In order to make job status/progress available to a scheduling (MRP) system,
a Work Order number for parts must be entered (or imported from a CSV
file) in the Parts List before a job is
nested. The Sheet Wizard tracks job data associated with the Work Order
number, which is then sent to a CSV file output to the folder selected
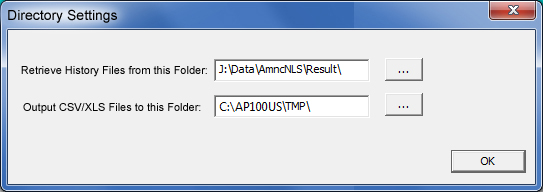
in the Directory Settings>Output CSV/XLS
Files... field shown below. From this folder the CSV file can then
be retrieved by the user's MRP system.
Note: The CSV file contains the Work Order #, job progress (in %), start and end times, as well as material information.
Settings
Directory Settings allow the user to retrieve history files and output
CSV or XLS files. Click the button and browse to a directory and then
click OK.