Save Arm Data to Part - TK & PSR
Saving parts with Part Remover Arm data speeds up the nesting process because these "ready-to-unload" parts can easily be used in the Sheet Wizard, or pulled onto any sheet at a later date. A part can be saved with a part remover arm at multiple angles by using the options on the scaled-down version of the Unloading menu while in the program is in Part View.
A suitable machine, such as an ACIES-TK, F1-TK, HPTK or PSR must be loaded.
Saving Parts
with Part Remover Arm data for TK Machines
To save a part
with angles and a Part Remover Arm, select
the part (if in Sheet View)
and switch to Part View. (Also
try hitting the <F5> key to toggle between Part and Sheet views.)
Then click the Modules tab to
open this window -
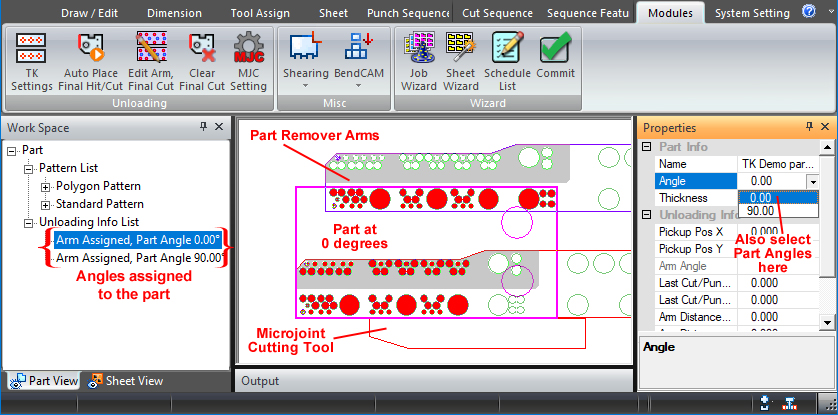
With a TK Combo machine loaded, all the Unloading submenu options are active. To edit settings for a TK machine, click TK Settings to open the TK Unloader Settings window.
1) Select the Edit Arm icon and the Part Properties panel shown on the right side will open.
2) In the Angle field, enter the angle that the part with arm will be saved at and then hit <Enter> or <Tab> on the keyboard to confirm the value and make the part rotate to the given angle.
Note: If the part will be nested at its default angle of 0 (in addition to other angles), part remover arms must also be saved to the part at the default angle.
3) If part remover arms have not been assigned, click the part and then drag the circle along the border of the part to place the arms on the part.
When the arms appear over the part, position them by left-clicking and dragging one or both arms so that as many suction cups as possible will be enabled (turn red) over the part. With a TK machine, the upper arm may be adjusted independently.
If part remover arms have previously been assigned to the part, click the part in the work area and the part remover arms will appear over the part as in the image above. Adjust arm positioning if needed.
4) When the angle and arm placement are satisfactory, right-click on the part to confirm and an Arm Assigned, Part Angle x.xx entry will appear in the Work Space tree on the left side.
The user may switch between angles of the parts by clicking on an angle row in the tree, or on the angle pull-down in the Properties panel. Delete angles by right-clicking the angle row and selecting Delete from the menu.
Save
As the Part
It's best to Save As the part with angles to
create a new copy rather than over-writing the existing part. In the image
below, the TK Demo part-0-90.prt
has been saved with angles and arms at 0 & 90 degrees. Notice that
the actual Angle of the part (shown in the second row under Part Size)
has not changed, because the default angle of the part was not changed.
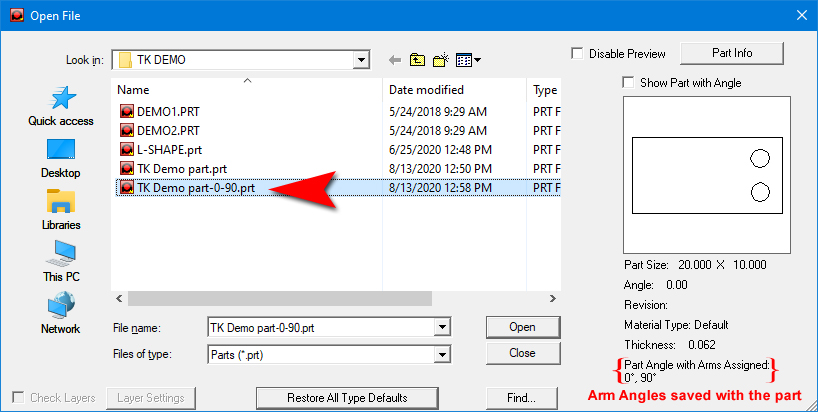
Note: When the user assigns an angle and saves
an arm with the part, this does not create an additional copy of the part.
This angle/remover arm info is saved with the part itself.
To create a separate copy as shown above, Save As the part.
Nesting
the Part in Sheet Wizard
A part with angle/arms can be used in any nesting job that originates in
AP100US, but the primary use is to speed up the nesting process in the
Sheet Wizard module. Parts with angles
and arms assigned can be opened in the Sheet Wizard Parts
List for Nest by clicking the Add button
in the Sheet Wizard interface. Set a Quantity,
enable Rotation and any other
options as needed and then Start Nesting.
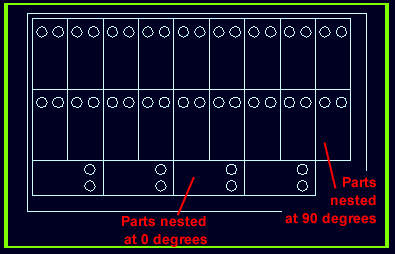
The Sheet Wizard will detect the angle/arms saved with the part(s) and
allow them to rotate to the specified angles as shown here -
Saving
Parts with Part Remover Arm data for PSR Machines
To save a part with angles and a Part Remover Arm, select
the part (if in Sheet View)
and switch to Part View. (Also
try clicking the <F5> key to toggle between Part and Sheet views.)
Then click the Modules tab to
open this window -
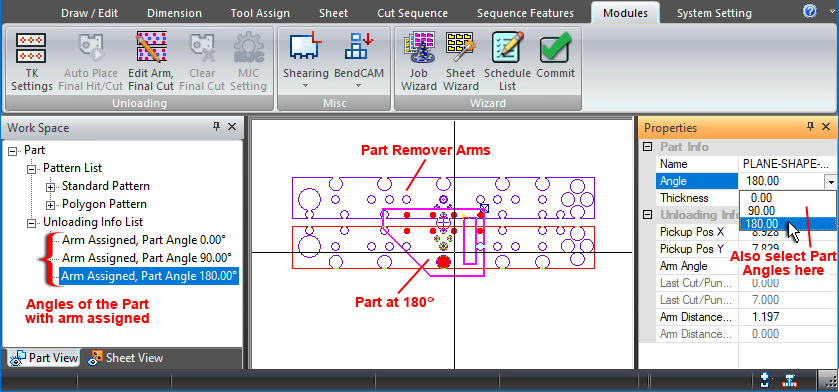
This part has been saved with three different angles - 0, 90 & 180
With a PSR machine loaded, only the TK Settings and Edit Arm, Final Cut options in the Unloading submenu are active. To edit settings for a PSR machine, click TK Settings to open the PSR Unloader Settings window. When using this option with a PSR, the user will notice that the pickup arm itself can be rotated to various angles.
To save parts with part remover data when using a PSR with a laser machine, follow the basic instructions above for TK machines.