Note: This option applies only to ATC machines.
The ATC tool cabinet is structured to hold two dies for every one tool. In the ATC Storage panel the user must select Die Clearances for each of the two dies and from these choices the program will select the more suitable die.
Note: While AP100US allows six Die Clearances to be assigned to one tool, the ATC machine allows only two.
Assign Die Clearances to Tools
Die Clearances must be saved with a tool before the tools are added to
the ATC Storage. More than one Clearance can be attached to a tool. Assign
Die Clearances to a tool in the Tool
Inventory panel. For info on this see Creating
and Editing Tools > Die Clearances.
Select Die Clearance(s) for Specific Tools
After tools have been added to the ATC Storage, highlight the tool in the
list as shown in the image below and then select the two Die Clearances
that will be available for that tool. The Die Clearances that appear in
the pull-down menus are those that were previously assigned to the tool.
(One or more Clearances may be available for each Die.) Select a different
Clearance for each of the two Dies. See Adding
Tools to the Turret or Adding
Tools to the PDC/ATC for more info.
The Die Clearances selected for each tool also appear in the Sheet Info and Sheet Properties windows, where the user may select a different die clearance (if other clearances have been previously saved with the tool).
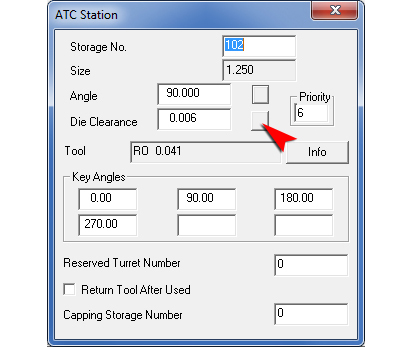
When a tool/row is double-clicked in the ATC Storage window, the ATC Station window will appear. The Die Clearance that appears in the Die Clearance field will be the active die that was selected automatically based on the values given in the Preferences>Tool Assignment>Parameters window.
The Die Clearance option on the Toggle Toolbar must be switched ON for the die clearance value to take effect.
If more than
one Die Clearance was added to the tool, the user may use the toggle button
(indicated) to select another Die Clearance.
See PDC ATC Station Window for
more info.