It may be necessary after tooling the sheet to ensure that the tools do not travel outside of the table range. You will also want to ensure that there is no tool interference, and check for duplicate hits to ensure an efficient sequence.
Options covered here are -
![]()
Check the tool travel to determine if any tool hits are outside the travel limits of the table. You can only use this option while Sheet view is active. Select Check Tool Travel from the Tool Assign tab and move into the work area. Click the patterns that you suspect fall outside the travel boundaries. Tool hits outside the range of the table appear in the Tool Hit Out of Range color as defined in the Preferences>Color Parameters window.
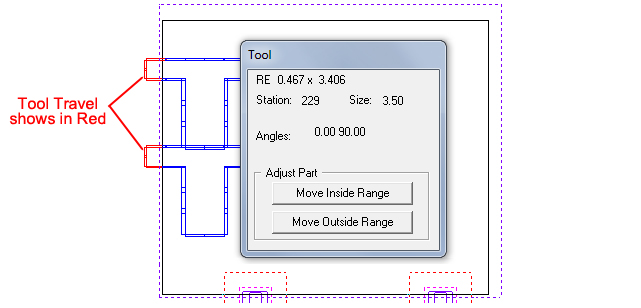
If the system finds tools that are out of range, the Move Inside Range and Move Outside Range buttons in the Adjust Part section of the Tool window become active.
Move
Inside Range
Click the Move Inside Range button if you want the system to shove the
part inside the range. You must readjust the part in relation to the other
parts on the sheet. The option indicates where the part(s) must be located
to remain inside the range.
Move
Outside Range
Click the Move Outside Range button if you want the system to shove the
part over until it is outside the range. You must readjust the part in
relation to the other parts on the sheet. The option indicates where the
part(s) must be located to be completely outside
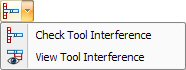
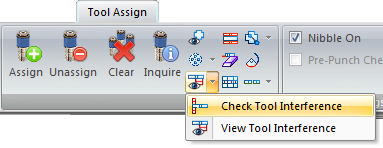
This option allows you to check for tool interference either from a tool punching inside the part or onto an adjacent part. You can use the option in Part or Sheet view.
To have the program show interference between tools, check ON the Show Tool Interference option in Preferences>Display Options.
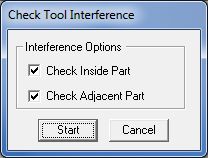
Check
Inside Part
This option checks for tools assigned
to the part that interfere with the part integrity. To enable this option,
place a check mark inside the check box.
Check
Adjacent Part
This option checks for tools assigned
to the part that interfere with the integrity of a neighboring part. To
enable this option, place a check mark inside the check box.
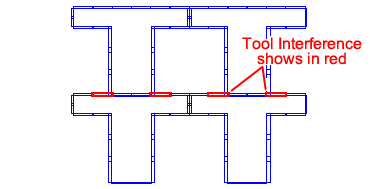
Note: The color used to hi-lite tool interference can be modified in the Preferences>Color & Style Parameters>Item Color panel.
This option must also be enabled in the interface by using the Tool Interference options on the Tool Assign tab.
Once you have calculated the tool interference using the Check Tool Interference option (above), you can use View Tool Interference to display the problem areas. Select View Tool Interference from the Tool menu. The problem areas appear in the Tool Interference (Gouge) color as defined in the Color Parameters folder of the Preferences window.
![]()
This option removes any tool hits that are completely covered by another tool hit assigned to a different pattern.
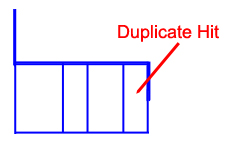
In this example, the first rectangle tool would be unassigned because the tool assigned is completely covered by the second rectangle tool.