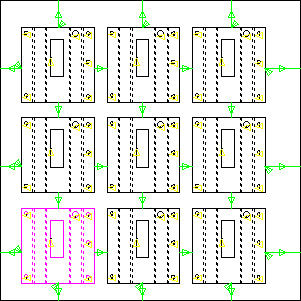
Sample of cuts placed on a sheet
using the Split Sheet option
The Split Sheet option allows the user to auto-cut a sheet into smaller sections in the X and Y directions for easier handling while unloading.
This option only works with cutting and combo machines. Split Sheet settings can be found in the Material Info>Process Type>Split Sheet tab.
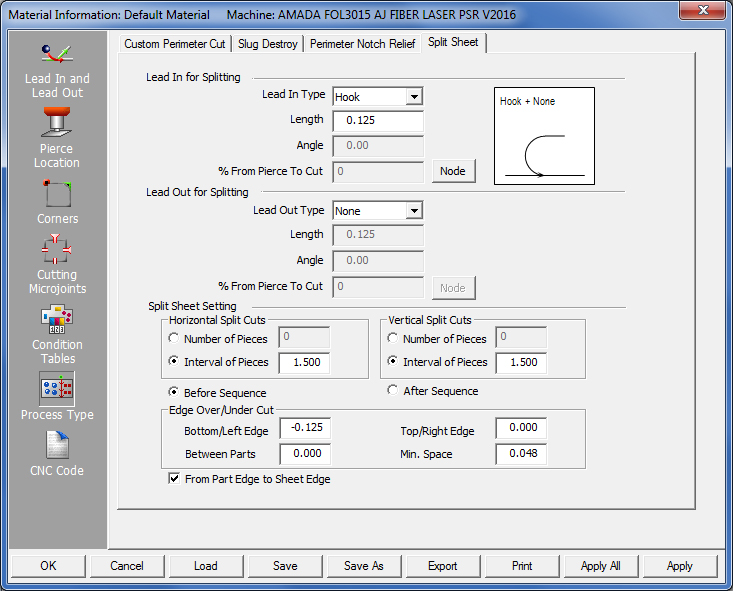
Lead In/Out for Splitting
Enter Lead in and/or Lead out settings that take effect only when the Split Sheet option is in use on the sheet.
|
|
Lead In for Splitting
Lead in Type |
Choose between Line or Hook to enable lead-ins on cuts between parts on the sheet and None to disable lead-ins.
In this close-up of
a part corner lead-ins
|
Length / Angle
|
Enter the length and angle of lead-ins. Choose values that will not allow lead-ins to cut across the face of adjacent parts. Note: Length and angle values entered here are passed on to the Slug Destroy Pitch option in Split Cutouts. To avoid having a lead-in/out that cuts into the part itself, be sure to test the length and angle values carefully!
|
% From Pierce to Cut
|
When the user presses the Node button the Cutting Condition dialog opens, allowing the user to select cutting conditions. In the % From Pierce to Cut field enter a value (given in a percentage from the Start Point) for the location of the node.
|
Lead
Out for Splitting |
Lead-outs are applied in a similar fashion. For full information on the use of these types of options, see the Lead In and Lead Out panel. Note: The From Part Edge to Sheet Edge option must be enabled for Lead In/Out to work.
|
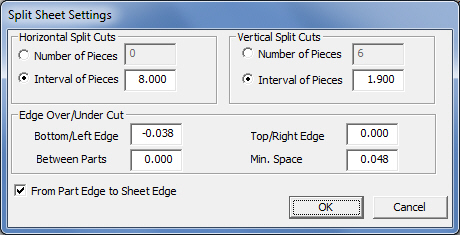
Split Sheet Settings |
|
Horizontal/Vertical |
To place Horizontal and Vertical cuts, select to cut the sheet into a specific number of pieces, or the size of the interval between pieces.
|
Before
Sequence/ |
Allows the user to begin the split sheet sequence before or after the parts on the sheet are sequenced. The default setting causes the split sheet sequence to occur before, which is preferable in most cases.
|
Edge Over/Under Cut |
This function allows the user to over-cut (Edge Over) or under-cut the edges of the sheet. Choose Bottom/Left Edge and/or Top/Right Edge and enter values accordingly. (For example, a negative value of -0.100 allows the cut to extend one hundredth of an inch over the edge of the sheet. A value of 0.00 will cut to the very edge.) The Between Parts field controls the distance between split cut and part boundary, and Min. Space is the value that the distance or interval between cuts cannot be less than.
|
From
Part Edge |
This function causes the cut to begin at the part and run outward toward the edge of the sheet. This box must be checked in order for the Lead-in and Lead-out options to function. |
|
|
| Applying
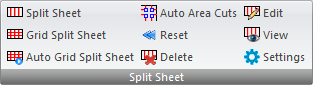
Split Sheet using User Interface Commands
Split Sheet commands as seen
in |
|
Split Sheet
|
Use this option to apply individual "split" cuts to a sheet when in Sheet View. Notes: When placing vertical or horizontal cuts by clicking on an open area or part, the system automatically makes the necessary calculations and decides whether a line in the X or the Y is most applicable. Typically, a click nearer the sides of the sheet places a split line in the X; a click nearer top or bottom places a split in the Y. This is based on user-entered values in the Material Info>Process Type>Split Sheet tab (shown near the top of this page) and internal calculations made by the software as it considers sheet size, number, size and arrangement of parts, etc. The system will automatically calculate and under cut for clamp dead zones. |
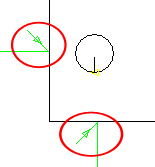
Grid Split Sheet
|
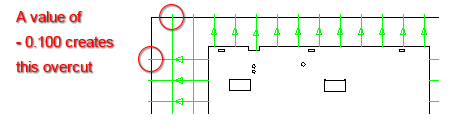
This will auto-grid the sheet based on number/arrangement of parts, where the user clicks when placing the split cuts and user settings. Note: When the user clicks closer to the sheet edge (circled in red) in the Horizontal or Vertical, a split will be forced in that direction as shown here -
|
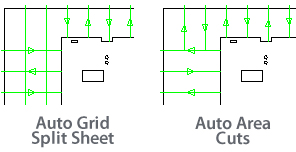
Auto Grid Split Sheet
|
When this button is selected, the sheet is immediately gridded according to the number/arrangement of parts and user settings. With this option, horizontal and vertical cuts may overlap, cutting the sheet into even smaller pieces. (See the results comparison between Auto Grid and Auto Area Cuts in the image below.)
|
Auto Area Cuts
|
When this button is selected, the sheet is immediately gridded according to the number/arrangement of parts and user settings. With this option, horizontal and vertical cuts do not overlap and may leave longer sections of the sheet uncut.
Image of the same part near the corner
of a
|
Reset
|
After "split" lines have been placed, click Reset and then hit <y> on the keyboard to remove all "split" lines from the sheet. Hit <n> to cancel the operation.
|
Delete
|
After "split" lines have been placed, to individually remove unwanted lines select Delete and then move the cursor into the work area. Click on individual "split" lines or Area Cuts to delete.
|
Edit
|
Edit allows the user to select and move individual split lines. When dragging a split line from left to right on vertical splits, the distance between splits increases; when dragging from right to left it decreases. When dragging a split line from bottom to top on horizontal splits, the distance between splits increases; when dragging from top to bottom it decreases. In general, the program will average out distances between lines, and may drop or add lines to accomplish this. This option is active only after Grid Split Sheet, Auto Grid Split Sheet and Auto Area Cuts are used.
|
View
|
View allows the user to see the sequence of the split sheet cuts. This does not include the sequence of the parts.
|
|
|
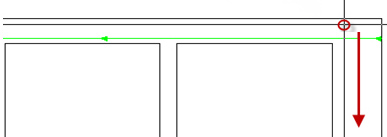
Select to open the Split Sheet Settings dialog, which is a scaled-down version of the Split Sheet options found in the Material Info>Process Type>Split Sheet tab (shown near the top of this page). Values and Options input here will also be updated in the Split Sheet tab.
Note: This particular Split Sheet Settings dialog is only available through the Split Sheet submenu discussed on this page; in this variation, splits are sequenced dynamically based on the relationship between parts. For Horizontal and Vertical cuts, select to cut the sheet into a specific number of pieces, or the size of the interval between cuts. Edge Over/Under Cut allows the user to over-cut (Edge Over) or under-cut the edge of the sheet. Enter values for Bottom/Left Edge, Top/Right Edge and Between Parts. Min. Space is the value that the distance or interval between parts cannot be less than. Only when the space between parts is larger than the minimum space, will the split cut be placed between parts; otherwise it will not cut between parts. Select From Part Edge to Sheet Edge to cause the cut to begin at the part edge and run outward toward the edge of the sheet as shown by the direction of the arrows in this image -
A negative value of -0.100 allows the
cut to extend A value of 0.00 will cut to the very edge. A negative value of -0.100 allows the cut to extend one hundredth of an inch over the edge of the sheet. A value of 0.00 will cut to the very edge. In addition to Lead-in / Out options, the only remaining option not available in this dialog is the Before Sequence/After Sequence option. The default setting with Before Sequence selected causes the split sheet sequence to occur before, which is preferable in most cases. The remaining option found only in the main Split Sheet tab allows the user to begin the split sheet sequence before or after the parts on the sheet are sequenced. The default setting causes the split sheet sequence to occur before, which is preferable in most cases. . |