Clipboard
![]() With
the Clipboard option the user can place parts from an existing sheet into
a buffer area so that they can be copied onto other sheets. This allows
the user to easily access parts and part groups that are often needed,
and copy them onto other sheets in the inventory.
With
the Clipboard option the user can place parts from an existing sheet into
a buffer area so that they can be copied onto other sheets. This allows
the user to easily access parts and part groups that are often needed,
and copy them onto other sheets in the inventory.
Single-Select Parts
A part selected on the Clipboard will appear in the Part Display field
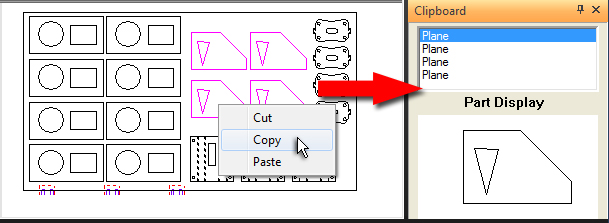
When the Clipboard icon is clicked, the Clipboard panel will display on the right side of the work area. Add parts to the clipboard by selecting individual parts, or left-click + Ctrl to select multiple parts as shown here. In the image above the user has Ctrl + clicked each of the four hi-lited parts and then right-clicked to open the flyout menu. When Copy was selected the four Plane parts were copied to the Clipboard panel as individual parts, which can now be copied individually to other sheets.
Note: Copy only ungridded or ungrouped parts to the Clipboard.
Box or Fence-select Parts
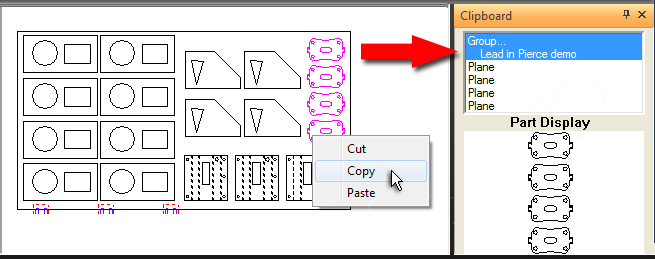
In this case the user box-selected the four hi-lited parts and copied them to the Clipboard. Box or Fence-selected parts are automatically grouped by the system. Notice the "Group" item on the Clipboard; Grouped parts bear this designation and the part name is on the second line. In the Part Display view the parts are shown exactly as they were copied from the sheet, and as they will be placed on another sheet.
The user may also cut parts from the current sheet to save on the Clipboard, which will remove the part(s) from the sheet. However, the user may copy the same part(s) from the Clipboard back to the current sheet.
Note: The Paste option is not active at this point.
To box-select parts, drag out a simple rectangle to enclose the parts to be copied as a group to the Clipboard. Release the mouse button to select parts and then right-click to open the flyout menu. To fence-select left-click to place the various points for the fence frame, right-click to join the lines and left-click again to finalize. Release the mouse button to select and then right-click to open the flyout menu.
Parts placed on the Clipboard will remain there until 1) the current AP100US session has ended and the program has been closed or 2) if the user clears the database to create a new sheet. See New Sheet for more info.
Placing Parts from the Clipboard onto a Sheet
To begin with, from C:\AP100US\SHEETS (or a different directory) open another sheet that has been prepared in advance. (If the database is cleared at this point to create a new sheet, parts on the Clipboard will be deleted.)
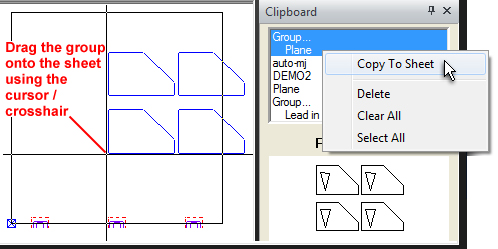
On the Clipboard hi-lite the part or part group to be copied to the sheet. Right-click to show the flyout menu and click Copy to Sheet. Drag the part or group onto the sheet and left-click to place. Use the Undo button to remove parts or groups that have been placed on the sheet. Parts and groups can be copied from the Clipboard to the sheet as often as needed.
Select a part or group and then select Delete to remove it from the Clipboard. Clear All removes all parts and groups from the Clipboard.
Use Select All to select all parts and groups on the Clipboard and copy them onto the sheet one-by-one. The program will allow parts and groups to be copied to a sheet as long as there is sufficient space.
Note: When copying groups to a sheet, consider checking OFF the snap feature if it interferes with placement. See Preferences>Display Options>Snap Point On.