Nesting Information

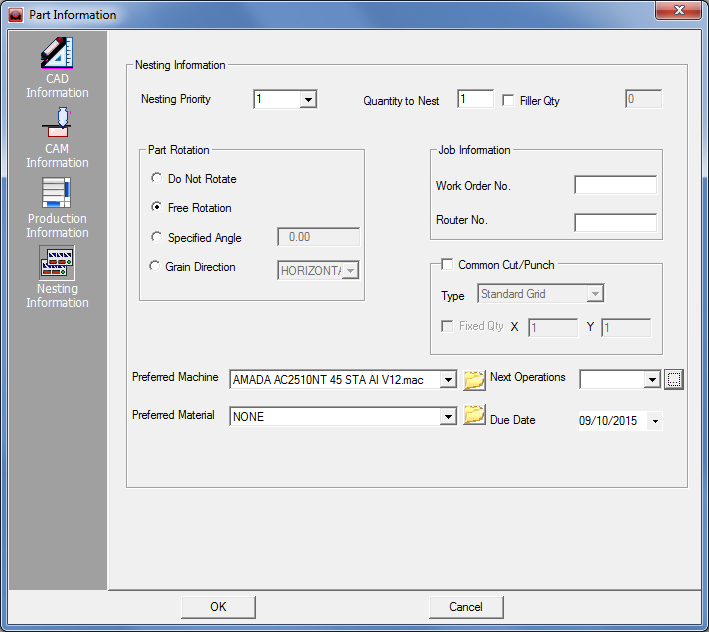
Modify the information related to the part in the Nesting Information panel.

Notes:

1.      The Part Number, Part Rotation, Material Group, Material Type, Thickness, Preferred Nest Machine and Preferred Nest Material are saved with the part file.

 2.      Click Add in the Part Information window after you have specified all the necessary information. The Part Information window will close and the part will appear as a line item in the Schedule panel.

Nesting Information


Nesting Priority

Default field. The default value is 1, but you can select an alternate priority, 1 through 10, from the drop-down list.


Quantity

to Nest

Required field. Type the quantity for the nested part.


Filler Qty

Optional field. The Filler Qty check box specifies whether the parts are nested within any empty spaces on the sheets. To enable the option, place a check mark in the check box. To disable the option, remove the check mark from the check box. Make sure to type a filler quantity in the text box to the right.


Part Rotation

These options determine the rotation parameters used during the nesting process.


Do Not Rotate

Select this option if you do not want the system to rotate the part during the nesting process.


Free Rotation

Select this option if you want the system to rotate the part at any angle during the nesting process.


Specified Angle

Select this option if you want the system to rotate the part at a specific angle during the nesting process. Make sure to specify an angle value in the text box to the right.


Grain Direction

Optional. Select this option if you want the system to use the grain direction of the material as a parameter to determine the part rotation. Make sure to select a grain direction (NONE, HORIZONTAL or VERTICAL) from the drop-down list. The preview pane in the Part Info window updates, displaying either a horizontal or a vertical red arrow to indicate the selected grain direction.

Job Information

The fields in this section display the work order and router information assigned by the user.

Note:  AP100US can still utilize and function with FabriTRAK.


Work Order No.

The work order number in this field is assigned by and can be edited by the user in AP100US.


Router No.

The Router number in this field is assigned by and can be edited by the user in AP100US.

Note: Both numbers will appear in the Sheet Information window Part List in AP100US.

Common Cut / Punch

The Common Cut / Punch function allows Grid nesting in the X and Y directions. Place a check in the checkbox to enable.


Type


Fixed Qty


Select either Standard Grid, X-Direction or Y-Direction -

Standard Grid (default), follows the current logic, while taking into consideration the sheet size in order to arrange the parts. When this option is selected and Fixed Qty is checked, both X and Y fields are editable and quantities can be controlled for both directions.


X-DIR / Y-DIR, compares the sheet size with the overtravel, and bases arrangement of the parts on the lesser of the values. When X-DIR is selected and Fixed Qty is checked, only the X field is editable. Likewise, with Y-DIR checked, only Y is editable.


Preferred Machine

Optional. You can use the navigation button to select a preferred machine (*.mac) file to create the parts.

Preferred Material

Optional. You can use the navigation button to select a material file and apply the settings to the nesting process.

Next Operations

Optional. Select the next operation in the production process for the nested part.

Modify the contents and/or order of the next operation by clicking the button to the right of the Next Operations pull-down field to display the Next Operation Customization dialog shown here -


Highlight a line item and click the green up/down arrows to change the order. Click the + button to add a new operation by entering text in the new field created at the bottom of the list. Click the - button to delete an already selected line item.

Operations shown in the Description column will vary according to machine type in use.


Due Date

Required. Enter the due date using the MM/DD/YY format, or open the Calendar and select the desired due date. The navigation arrows along the top of the calendar allow you to view the desired month. The system uses the value in the Due Date field to automatically schedule the parts you want nested.

Add

Includes the part for nesting.

Cancel

Discontinues the process.