Chapter 3
Any report prints some data. In FastReport, you can operate with the following data:
data sources;
system variables;
total values;
report parameters;
expressions, containing any of the above mentioned data.
In this chapter, we will look at how to work with these data.
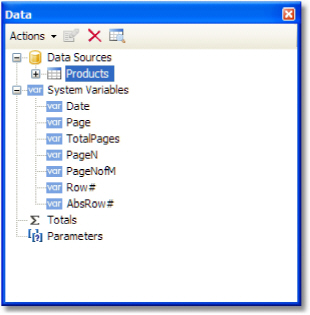
All data is accessible from the "Data" window. This window can be shown by choosing the "Data|Show Data Window" menu.
The "Data" window allows to operate with all data elements and also to drag them into the report page. All operations can be done with the help of the toolbar and "Action" menu:

A part of these operations is duplicated in a context menu of the "Data" window. For example, if you select a data source, you can use its context menu to create a calculated column, delete a data source, or view its data.
Ordinarily, the data source represents a DB table or SQL query. There can be several data sources in a report. For most of reports, only one data source is needed. A report like Master-Detail needs two data sources which are connected to each other using a relation (we will learn about it later in this chapter).
Data source has one or several data columns. Each column has a definite data type. To look at column type, select it and open the "Properties" window. Column type is indicated in the "DataType" property. The icon near the column name also helps to determine its type.
There are two ways to define a data source for the report.
The first method - data source is defined in the application and registered in a report. It's up to the programmer who created this application (see details in the "Programmer's manual"). A user should only choose the needed data source in order to use it in a report. It can be done in the "Data|Choose Report Data..." menu.
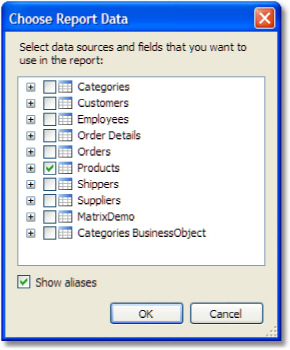
All data registered in a report is listed in this window. Just tick off those data which are needed in your report. It can be done at any moment while working with a report.
The second method - you create a new data source yourself. It can be a DB table or a SQL query. In such a case, data source definition is saved in a report file.
FastReport allows connecting to many popular DBMS (data base management systems) such as MS SQL, Oracle, Interbase, Access. Besides this, you can use data files which are saved in xml/xsd format.
DB table content is not saved in a report file. Instead, the connection string and the data source schema are stored. A connection string can contain such data as login and password, that is why it is kept ciphered in a report file. When needed, you may increase the safety by using own key for data ciphering. In this case a report file can be opened correctly only in your program.
To create a new data source, choose the "Data|Add Data Source..." menu item or press the "Actions" button in "Data" window and choose the "New Data Source..." item. You will see the "Data Wizard" window:
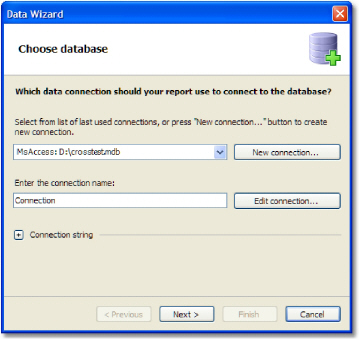
First of all, you are offered to create the connection. For that, press the "New connection..." button. You will see a window with connection settings:
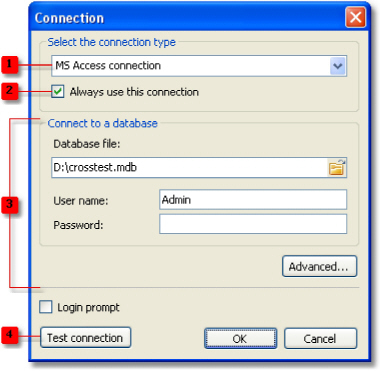
The following elements are shown in the figure:
1.Connection type;
2.If enabled, the chosen connection type will be used by default.
3.Connection settings;
4.Test connection button
Connection with MS Access data base is shown in the picture. If another type of connection is chosen, then connection settings area (3) will be changed. For example, connection to MS SQL data base has the following settings:
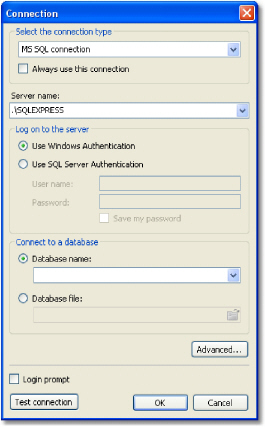
Choose the needed connection type and set up its parameters. After pressing the OK button, the window will be closed and you will return to the data wizard window.
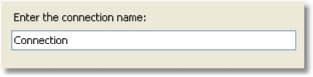
Next, you need to set a connection name. This name will appear in the "Data" window.
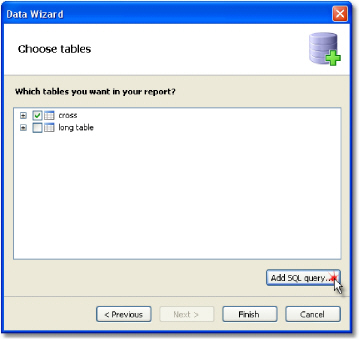
Press the "Next" button to continue. Here you will be offered to choose tables which are accessible in the data base:
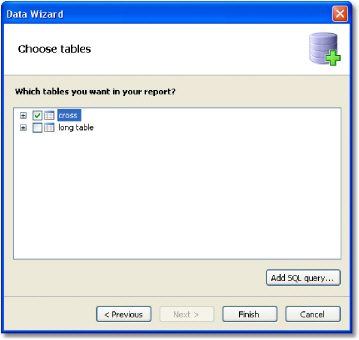
Tick off the needed tables and close the wizard by pressing the "Finish" button. Now you can see in the "Data" window a connection created by you which contains the chosen data sources:
Data wizard allows quickly choosing tables, contained in a data base. Creation of SQL query requires additional work. For this, press the "Add SQL query..." button in the second step of the wizard.
You will see the query wizard window. Query wizard has four pages. Use the "Next" and "Back" buttons to switch between the pages.
In the first step, you need to set the name of a query. This name will appear in the "Data" window. Enter any unique name and press the "Next" button.
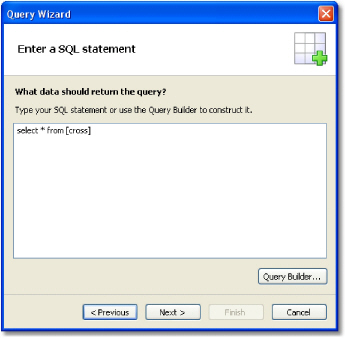
In the second step, you have to enter a query in SQL language. Use the language dialect which is supported by your MSDB. You can use the query builder for visual query creation. To do this, press the "Query Builder" button. The query builder will be described in details later.
After you have entered the query text, press the "Next" button. In the third step, you can define the query parameters. It is required if your query has parameters. We will consider parameters later in this chapter.
On the last step of the wizard, you can set up the columns which were returned by the query:

If you made a mistake in the query text or in the parameter definition, you will see error message when turning to the last page of the wizard.
As a rule, it is enough to be assured that the query has returned all the needed columns. On this step, you can do the following:
delete unnecessary columns using the "Delete" button;
reset the columns by pressing the "Refresh" button;
add a calculated column by pressing the "Add calculated column" button. For a new column, it is necessary to set the "Name", "DataType" and "Expression" properties.
After closing the wizard by pressing the "Finish" button, you will return to the "Data wizard" window.
There can be parameters in a query text. Let us see the following query:
select * from DVDs
where Title = @param1
This is the query to MS SQL demonstration database. The parameter with "param1" name is defined in a query. Here it should be noted: method of describing parameters in a query differs for different DBMS. For MS SQL a parameter is marked by a "@" symbol, MS Access parameters do not have names and are marked by the "?" symbol.
If your SQL query contains parameters, you have to declare them. It can be done in the third step of the "Query Wizard" which we have looked at above. To create a parameter, press the "Add parameter" button. A new parameter will be created:

The following parameter's properties should be set in the properties window:
Property |
Description |
Name |
Parameter name. Here you need to indicate the same name which you use in the query text. Some DBMS (for example, MS Access) do not support named parameters. In this case do not change this property. |
DataType |
Parameter data type. |
DefaultValue |
Value which will be used if the "Expression" property is not specified, or if it is impossible to calculate it (for example, when operating with the query in the report design mode). |
Expression |
Expression which returns parameter's value. This expression will be processed when you run the report. You can indicate any expression in this property (see details in the "Expressions" chapter). |
Size |
Parameter data size. This property should be indicated if the parameter is of "string" data type. |
If you set the parameter properties incorrectly, you will get an error when turning to the last page of the wizard.
Passing a value to the parameter
Parameters are often used to ask a value from the user. Let us look at two ways to pass a value to the query parameter.
In the first way, you pass a value programmatically. Since there is no easy way to pass a value directly to the query parameter, you need to use the report parameter, which can be easily set via code. You should do the following:
Create the report parameter (we will discuss the report parameters later in this chapter). Set the same DataType for the report parameter, as it is used in the query parameter.
In the "Expression" property of the query parameter, refer to a report parameter, for example:
[MyReportParameter]
Pass a value to the report parameter:
report1.SetParameterValue("MyReportParameter", 10);
In the second way, you use the dialogue forms to do this (dialogue forms will be discussed later). For example, if you need to ask a string-type value, do the following:
add a dialog into your report;
put the "TextBoxControl" on it. This control will be used to enter the string value;
set up the parameter as follows:
Name=param1
DataType=VarChar
DefaultValue= (empty string)
Expression=TextBox1.Text
Size=255
Where TextBox1 is a control which contains a value entered by the user.
Data connection which was created with the help of the "Data Wizard", can be edited. In order to do this, choose the data connection in the "Data" window and press the "Edit" button on the toolbar. You will see a data wizard window which we have looked at earlier. In this window, you can change the connection settings, by pressing the "Edit connection..." button. The type of connection cannot be changed.
On the second page of the wizard, you can select the tables which you want in your report. When you have done, press the "Finish" button.
Data source which was created with the help of the "Data Wizard", can be edited. In order to do this, choose the data source in the "Data" window and press the "Edit" button on the toolbar. You will see a "Query Wizard" window which we have looked at earlier. In this window, you can change the SQL query text, set up the query parameters and data columns.
In order to delete the data source, select it and press the "Delete" button on the toolbar. During this physical deletion of the source does not occur, it just changes to inaccessible. You can enter into the "Data|Choose Report Data..." menu and enable such a data source.
However, this should never trouble you, because deleted data sources are never saved in the report file, and accordingly, do not get restored when the report is being read the next time.
Every data element (data sources and columns) has got its own name. By default, this is the name defined in the database. In some cases, it can be difficult to understand what is hidden behind such name, for example, ProdID.
Data elements have got a second name - alias. By using an alias, you can rename an element. For example, if we have got a data source CATEGORY_TABLE with a column called "PROD_ID", you can give the following alias:
CATEGORY_TABLE --> Categories
PROD_ID --> Product ID
You can refer to such a data column in the following way:
[Categories.Product ID]
When referring to the data element, you must use the alias, if it has been defined. Never refer to an element by using its original name in this case.
In order to rename a data element in this case, choose it in the "Data" window, and press F2. Also, you can select a "Rename" item in the object's context menu. After this, enter the required name and press Enter.
You can also rename an element by using the "Properties" window. Select an element in the "Data" window, switch to the "Properties" window and change the value of the "Alias" property.
In order to delete an alias (reset to the original name), select an element and choose the "Delete alias" item in its context menu.
The data sources we have looked at, are relational, that is, they come from a relational DBMS (often called RDBMS). FastReport also supports other kinds of data - the hierarchical data sources. Such data sources come from so-called business objects, which are often used in applications to represent a relational data sources as a .Net classes.
The
only way to add a hierarchical data source in your report is to register
it programmatically. It will be discussed in the "Programmer's
manual". Now we will look at some differences between ordinal
and hierarchical data sources. In the figure below you can see two data
sources, "Categories BusinessObject" and "Products".
As you can see, the "Products" data source is contained
within its parent, "Categories BusinessObject":
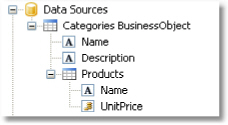
This means that, these two data sources are related to each other and can be used in the "master-detail" report type. You can also use each of these data sources separately in a "simple list" report type.
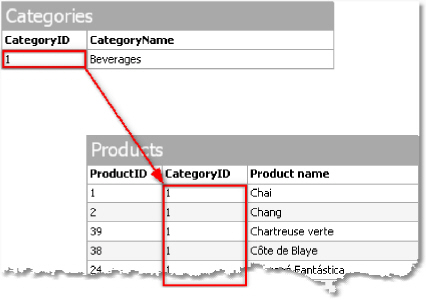
Between two data sources, a relation can be set. The relation is used to define the "master-detail" relationship. For example, one record in the "Categories" table can have multiple entries in the "Products" table:
In order to create a relation, you need to indicate the following:
Parent table;
Child table;
Set of key columns in the parent table;
Set of key columns in the child table.
As an example, we will look at "Categories" and "Products" tables from the demo database. They have the following structure:
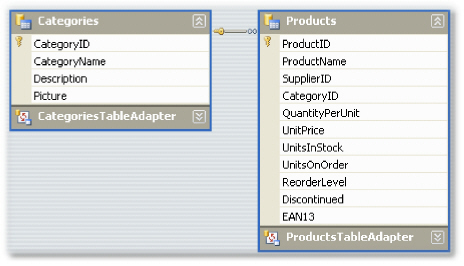
Both tables have got the CategoryID field, on which the relationship can be set. So, one category may contain several products.
How can related data sources be used in FastReport? There are two methods of doing this.
First method makes it possible to build reports of "master-detail" type. To do this, two "Data" bands are used. The master band is connected to the master data source, the detail band - to detail data source. Our example will be like this:

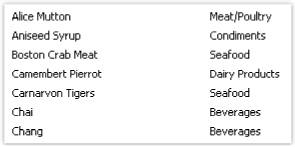
Such a report, if you run it, will print a list of products in every category:

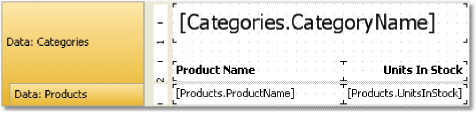
The second method allows referring to the master from the detail data source. We will show this by an example. Let us say, we want to print a list of all the products. For this, we need one "Data" band, which is connected to the "Products" table:
![]()
Such a report will print all the products from all the categories. Let us say, beside each product, we want to print a category name to which it belongs. Without using relation, this would have been harder. All we know about the product's category is its id (represented by "CategoryID" column in the "Products" table). Category name, which we would like to print, is stored in the "CategoryName" column of the "Categories" table. With the help of relation, we can refer to the name of a category in the following way:
[Products.Categories.CategoryName]
For the current row of the "Products" table, FastReport will find the corresponding parent row in the "Categories" table, and return a value of the "CategoryName" column.
In a general case, way of referring to a parent table field allows an unlimited number of table ancestors:
[Child_table.Its_parent.Parent_of_a_parent.And _so_on.Column_name]
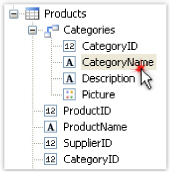
To add such a data column into a report, open the "Products" table in the "Data" window. You will see that among its columns, there is a link to the "Categories" table:

If we drag the column shown above into the report, then we will get a "Text" object with a text:
[Products.Categories.CategoryName]
Our report will be as follows:
![]()
If we run it, we will see the following:
In order to create a relation, click the "Actions" button in the "Data" window, and select the "New relation..." item. You will see the relation editor:
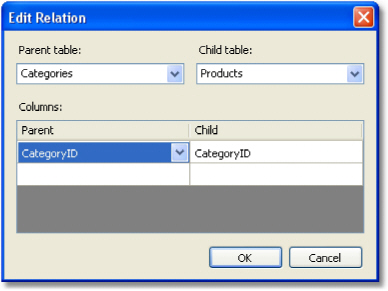
In the first place, you need to choose the parent and the child tables. After this, in the lower part of the window, you need to choose related data columns. The tables can be related with the help of one or several data columns. After the columns have been set, close the relation editor by pressing the Ok button.
The relation that you've created can be seen in the "Data" window, if you choose the child data source and open a list of its columns. Among the columns, you will see the relationship with the parent source:
Parent source's data column can be inserted onto the report by using the drag&drop method. So, if we choose the columns shown in the figure, and drag it onto the report page, we will get a "Text" object with the following contents:
[Products.Categories.CategoryName]
In order to edit a relation, open the list of columns of the child data source, find the needed relation and click the "Edit... " button located on the toolbar. This will invoke the relation editor we have looked at earlier.
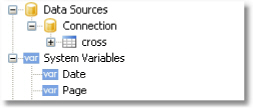
There is a list of system variables that can be used in a report:
Variable |
Description |
Date |
Date and time of the report's start. |
Page |
Current page number. |
TotalPages |
Total number of pages in the report. To
use this variable, you need to enable the report's double pass.
You can do this in "Report|Properties..." |
PageN |
Page number in the form: "Page N". |
PageNofM |
Page number in the form: "Page N of M". |
Row# |
Data row number inside the group. This value is reset at the start of a new group. |
AbsRow# |
Absolute number of data row. This value is never reset at the start of a new group. Current page number. If you join several prepared reports into one package, this variable will return current page number in a package. |
Page# |
This variable is actually a macro. It value
is substituted when the component is viewed in the preview window.
That means you cannot use |
TotalPages# |
Total number of pages in the report. If
you join several prepared reports into one package, this variable
will return the number of pages in a This variable is actually a macro. It value is substituted when the component is viewed in the preview window. That means you cannot use it in an expression. |
HierarchyLevel |
Current level of hierarchy in a hierarchical report (see "Printing hierarchy "). The top level is equal to 1. |
HierarchyRow# |
Full row number like "1.2.1" in a hierarchical report. |
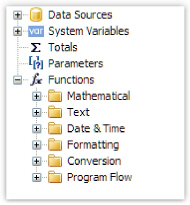
FastReport.Net contains a lot of built-in functions (over 60). All functions are splitted to several categories and are accessible through the "Data" window:
You may use a function in any expression, in the script (see the "Script" chapter), or print its value in the "Text" object. For example, the following text in the "Text" object:
[Sqrt(4)]
will be printed as "2" (square root of 4).
The following expression will return 4:
Sqrt(4) + 2
Let us look at the ways to insert a function in a report:
you may drag&drop a function from the "Data" window to a report page. The "Text" object will be created, which contains a function call. You have to edit the text to add parameters to the function call;
you can drag&drop a function to the script code;
in the expression editor, you can see a copy of the "Data" window which acts the same way- you may drag items from it and drop them in the expression text.
Below we will describe each function in details.
Function |
Parameters |
Return value |
Abs |
sbyte value |
sbyte |
Abs |
short value |
short |
Abs |
int value |
int |
Abs |
long value |
long |
Abs |
float value |
float |
Abs |
double value |
double |
Abs |
decimal value |
decimal |
Returns the absolute value.
Example:
Abs(-2.2) = 2.2
Function |
Parameters |
Return value |
Acos |
double d |
double |
Returns the angle (in radians) whose cosine is d. d must be in range between -1 and 1.
Multiply the return value by 180 / Math.PI to convert from radians to degrees.
Example:
Acos(0) * 180 / Math.PI = 90
Function |
Parameters |
Return value |
Asin |
double d |
double |
Returns the angle (in radians) whose sine is d. d must be in range between -1 and 1.
Multiply the return value by 180 / Math.PI to convert from radians to degrees.
Example:
Asin(0) = 0
Function |
Parameters |
Return value |
Atan |
double d |
double |
Returns the angle (in radians) whose tangent is d.
Multiply the return value by 180 / Math.PI to convert from radians to degrees.
Example:
Atan(1) * 180 / Math.PI = 45
Function |
Parameters |
Return value |
Ceiling |
double d |
double |
Ceiling |
decimal d |
decimal |
Returns the smallest integer greater than or equal to d.
Example:
Ceiling(1.7) = 2
Function Cos |
Parameters double d |
Return value double |
Returns the cosine of the specified angle (d). The angle must be in radians.
Multiply by Math.PI / 180 to convert degrees to radians.
Example:
Cos(90 * Math.PI / 180) = 0
Function |
Parameters |
Return value |
Exp |
double d |
double |
Returns e (2.71828), raised to the specified power d.
Example:
Exp(1) = 2.71828
Function Floor |
Parameters double d |
Return value double |
Floor |
decimal d |
decimal |
Returns the largest integer less than or equal to d.
Example:
Floor(1.7) = 1
Function |
Parameters |
Return value |
Log |
double d |
double |
Returns the logarithm of a specified number d.
Example:
Log(2.71828) = 1
Function |
Parameters |
Return value |
Maximum |
int val1, |
int |
Maximum |
long val1, |
long |
Maximum |
float val1, |
float |
Maximum |
double val1, |
double |
Maximum |
decimal val1, |
decimal |
Returns the larger of val1, val2.
Example:
Maximum(1,2) = 2
Function |
Parameters |
Return value |
Minimum |
int val1, |
int |
Minimum |
long val1, |
long |
Minimum |
float val1, |
float |
Minimum |
double val1, |
double |
Minimum decimal val1, decimal
decimal val2
Returns the smaller of val1, val2.
Example:
Minimum(1,2) = 1
Function |
Parameters |
Return value |
Round |
double d |
double |
Round |
decimal d |
decimal |
Rounds d to the nearest integer.
Example:
Round(1.47) = 1
Function |
Parameters |
Return value |
Round |
double d, |
double |
Round |
decimal d, |
decimal |
Rounds d to a precision specified in the "digits" parameter.
Example:
Round(1.478, 2) = 1.48
Function |
Parameters |
Return value |
Sin |
double d |
double |
Returns the sine of the specified angle (d). The angle must be in radians.
Multiply by Math.PI / 180 to convert degrees to radians.
Example:
Sin(90 * Math.PI / 180) = 1
Function |
Parameters |
Return value |
Sqrt |
double d |
double |
Returns the square root of d.
Example:
Sqrt(4) = 2
Function |
Parameters |
Return value |
Tan |
double d |
double |
Returns the tangent of the specified angle (d). The angle must be in radians.
Multiply by Math.PI / 180 to convert degrees to radians.
Example:
Tan(45 * Math.PI / 180) = 1
Function |
Parameters |
Return value |
Truncate |
double d |
double |
Truncate |
decimal d |
decimal |
Calculates the integral part of d.
Example:
Truncate(1.7) = 1
Note:
these functions do not modify the string value passed in. Instead, they return a new modified string;
the first character in a string has 0 index. Keep it in mind when working with functions that take the character index, such as Insert.
Function |
Parameters |
Return value |
Asc |
char c |
int |
Returns an Integer value representing the character code corresponding to a character.
Example:
Asc('A') = 65
Function |
Parameters |
Return value |
Chr |
int i |
char |
Returns the character associated with the specified character code.
Example:
Chr(65) = 'A'
Function |
Parameters |
Return value |
Insert |
string s, |
string |
Inserts a "value" substring into the "s" string at a specified index position "startIndex" and returns a new string.
Example:
Insert("ABC", 1, "12") = "A12BC"
Function |
Parameters |
Return value |
Length |
string s |
int |
Returns the length of "s".
Example:
Length("ABC") = 3
Function |
Parameters |
Return value |
LowerCase |
string s |
string |
Converts all characters of "s" to lower case and returns a result.
Example:
LowerCase("ABC") = "abc"
Function |
Parameters |
Return value |
PadLeft |
string s, |
string |
Right-aligns the characters in the "s" string, padding with spaces on the left for a total width specified in the "totalWidth" parameter.
Example:
PadLeft("ABC", 5) = " ABC"
Function |
Parameters |
Return value |
PadLeft |
string s, |
string |
Right-aligns the characters in the "s" string, padding with "paddingChar" characters on the left for a total width specified in the "totalWidth" parameter.
Example:
PadLeft("ABC", 5, '0') = "00ABC"
Function |
Parameters |
Return value |
PadRight |
string s, |
string |
Left-aligns the characters in the "s" string, padding with spaces on the right for a total width specified in the "totalWidth" parameter.
Example:
PadRight("ABC", 5) = "ABC "
Function |
Parameters |
Return value |
PadRight |
string s, |
string |
Left-aligns the characters in the "s" string, padding with "paddingChar" characters on the right for a total width specified in the "totalWidth" parameter.
Example:
PadRight("ABC", 5, '0') = "ABC00"
Function |
Parameters |
Return value |
Remove |
string s, |
string |
Deletes all the characters from the "s" string beginning at "startIndex" position and continuing through the last position.
Example:
Remove("ABCD", 3) = "ABC"
Function |
Parameters |
Return value |
Remove |
string s, |
string |
Deletes a number of characters specified in the "count" parameter from the "s" string, beginning at a "startIndex" position.
Example:
Remove("A00BC", 1, 2) = "ABC"
Function |
Parameters |
Return value |
Replace |
string s, |
string |
Returns a string "s" in which a specified substring "oldValue" has been replaced with another substring "newValue".
Example:
Replace("A00", "00", "BC") = "ABC"
Function |
Parameters |
Return value |
Substring |
string s, |
string |
Retrieves a substring from the "s" string. The substring starts at a character position specified in the "startIndex" parameter.
Example:
Substring("ABCDEF", 4) = "EF"
Function |
Parameters |
Return value |
Substring |
string s, |
string |
Retrieves a substring from the "s" string. The substring starts at a character position specified in the "startIndex" parameter and has a length specified in the "length" parameter.
Example:
Substring("ABCDEF", 1, 3) = "BCD"
Function |
Parameters |
Return value |
TitleCase |
string s |
string |
Converts the specified string to titlecase.
Example:
TitleCase("john smith") = "John Smith"
Function |
Parameters |
Return value |
Trim |
string s |
string |
Removes all occurrences of white space characters from the beginning and end of the "s" string.
Example:
Trim(" ABC ") = "ABC"
Function |
Parameters |
Return value |
UpperCase |
string s |
string |
Converts all characters of "s" to upper case and returns a result.
Example:
UpperCase("abc") = "ABC"
Function |
Parameters |
Return value |
AddDays |
DateTime date, |
DateTime |
Adds the specified number of days ("value") to the "date" date and returns a new date.
Example:
AddDays(#7/29/2009#, 1) = #7/30/2009#
Function |
Parameters |
Return value |
AddHours |
DateTime date, |
DateTime |
Adds the specified number of hours ("value") to the "date" date and returns a new date.
Example:
AddHours(#7/29/2009 1:30#, 1) = #7/29/2009 2:30#
Function |
Parameters |
Return value |
AddMinutes |
DateTime date, |
DateTime |
Adds the specified number of minutes ("value") to the "date" date and returns a new date.
Example:
AddMinutes(#7/29/2009 1:30#, 1) = #7/29/2009 1:31#
Function |
Parameters |
Return value |
AddMonths |
DateTime date, |
DateTime |
Adds the specified number of months ("value") to the "date" date and returns a new date.
Example:
AddMonths(#7/29/2009#, 1) = #8/29/2009#
Function |
Parameters |
Return value |
AddSeconds |
DateTime date, |
DateTime |
Adds the specified number of seconds ("value") to the "date" date and returns a new date.
Example:
AddSeconds(#7/29/2009 1:30:01#, 1) = #7/29/2009 1:30:02#
Function |
Parameters |
Return value |
AddYears |
DateTime date, |
DateTime |
Adds the specified number of years ("value") to the "date" date and returns a new date.
Example:
AddYears(#7/29/2009#, 1) = #7/29/2010#
Function |
Parameters |
Return value |
DateDiff |
DateTime date1, |
TimeSpan |
Returns the interval (number of days, hours, minutes, seconds) between two dates.
Example:
DateDiff(#1/2/2009#, #1/1/2009#) = 1.00:00:00
Function |
Parameters |
Return value |
DateSerial |
int year, |
DateTime |
Creates a new DateTime value from the specified year, month and day.
Example:
DateSerial(2009, 7, 29) = #7/29/2009#
Function |
Parameters |
Return value |
Day |
DateTime date |
int |
Gets the day of the month (1-31) represented by the specified date.
Example:
Day(#7/29/2009#) = 29
Function |
Parameters |
Return value |
DayOfWeek |
DateTime date |
string |
Gets the localized name of the day of the week represented by the specified date.
Example:
DayOfWeek(#7/29/2009#) = "wednesday"
Function |
Parameters |
Return value |
DayOfYear |
DateTime date |
int |
Gets the day of the year (1-365) represented by the specified date.
Example:
DayOfYear(#7/29/2009#) = 210
Function |
Parameters |
Return value |
DaysInMonth |
int year, |
int |
Returns the number of days in the specified month and year.
Example:
DaysInMonth(2009, 7) = 31
Function |
Parameters |
Return value |
Hour |
DateTime date |
int |
Gets the hour component (0-23) represented by the specified date.
Example:
Hour(#7/29/2009 1:30#) = 1
Function |
Parameters |
Return value |
Minute |
DateTime date |
int |
Gets the minute component (0-59) represented by the specified date.
Example:
Minute(#7/29/2009 1:30#) = 30
Function |
Parameters |
Return value |
Month |
DateTime date |
int |
Gets the month component (1-12) represented by the specified date.
Example:
Month(#7/29/2009#) = 7
Function |
Parameters |
Return value |
MonthName |
int month |
string |
Gets the localized name of the specified month (1-12).
Example:
MonthName(1) = "January"
Function |
Parameters |
Return value |
Second |
DateTime date |
int |
Gets the seconds component (0-59) represented by the specified date.
Example:
Second(#7/29/2009 1:30:05#) = 5
Function |
Parameters |
Return value |
Year |
DateTime date |
int |
Gets the year component represented by the specified date.
Example:
Year(#7/29/2009#) = 2009
Function |
Parameters |
Return value |
Format |
string format, |
string |
Replaces the format item in a specified "format" string with the value of a corresponding Object instance in a specified "args" array.
For example, the following function call:
Format("Name = {0}, hours = {1:hh}", myName, DateTime.Now)
contains the following format items: "{0}" and "{1:hh}". They will be replaced with values of myName and DateTime.Now. The result may look as follows:
Name = Alex, hours = 12
Each format item takes the following form:
{index[,alignment][:formatString]}
index - a zero-based integer that indicates which element in a list of objects to format;
alignment - an optional integer indicating the minimum width of the region to contain the formatted value. If the length of the formatted value is less than alignment, then the region is padded with spaces. If alignment is negative, the formatted value is left justified in the region; if alignment is positive, the formatted value is right justified;
formatString -an optional string of format specifiers.
The following table describes the standard numeric format strings.
Format |
Name |
Description |
C or c |
Currency |
The number is converted to a string that represents a currency amount. |
Format("{0:C}", 10) = "$10.00" |
||
D or d |
Decimal |
This format is supported for integral types only. The number is converted to a string of decimal digits (0-9). |
Format("{0:D}", 10) = "10" |
||
E or e |
Scientific |
The number is converted to a string of the
form "-d.dddE+ddd" or "-d.ddde+ddd", where
each 'd' indicates |
Format("{0:E}", 10) = "1,000000E+001" |
||
F or f |
Fixed-point |
The number is converted to a string of the form "-ddd.ddd" |
where each 'd' indicates a digit (0-9).
Format("{0:F}", 10) = "10.00"
G or g |
General |
The number is converted to the most compact notation. |
Format("{0:G}", 10) = "10" |
||
N or n |
Number |
The number is converted to a string of the form "-d,ddd,ddd. ddd", where each 'd' indicates a digit (0-9). |
Format("{0:N}", 1234.56) = "1,234.56" |
||
P or p |
Percent |
The number is converted to a string that represents a percent. The converted number is multiplied by 100 in order to be presented as a percentage. |
Format("{0:P}", 0.15) = "15.00%" |
||
X or x |
Hexadecimal |
The number is converted to a string of hexadecimal digits. The case of the format specifier indicates whether to use uppercase or lowercase characters for the hexadecimal digits greater than 9. For example, use 'X' to produce "ABCDEF", and 'x' to produce "abcdef". |
Format("{0:X}", 26) = "1A"
If you format the floating-point values, you may indicate a number of decimal places after the format string:
Format("{0:C1}", 12.23) = "$12.2"
If the standard numeric format specifiers do not provide the type of formatting you require, you can use custom format strings:
Format |
Description |
|
|
0 |
Zero placeholder. If the value being formatted has a digit in the position where the '0' appears in the format string, then that digit is copied to the result string. The position of the leftmost '0' before the decimal point and the rightmost '0' after the decimal point determines the range of digits that are always present in the result string. |
|
# |
Digit placeholder. If the value being formatted has a digit in the position where the '#' appears in the format string, then that digit is copied to the result string. Otherwise, nothing is stored in that position in the result string. |
|
. |
Decimal point. The first '.' character in the format string determines the location of the decimal separator in the formatted value. |
|
, |
Thousand separator. If the format string contains a ',' character, then the output will have thousand separators inserted between each group of three digits to the left of the decimal separator. |
|
% |
Percentage placeholder. The presence of a '%' character in a format string causes a number to be multiplied by 100 before it is formatted. |
; Section separator. The ';' character is used to separate sections for positive, negative, and zero numbers in the format string.
Examples of use:
Format("{0:$#,##0.00}", 1024.25) = "$1,024.25"
Format("{0:00%}", 0.25) = "25%"
Format("{0:$#,##0.00;($#,##0.00);Zero}", 1024.25) = "$1,024.25" Format("{0:$#,##0.00;($#,##0.00);Zero}", -1024.25) = "($1,024.25)" Format("{0:$#,##0.00;($#,##0.00);Zero}", 0) = "Zero"
The following table describes the standard format specifiers for formatting the DateTime values:
Format |
Name |
Example |
d |
Short date pattern |
"8/9/2009" |
D |
Long date pattern |
"Sunday, August 09, 2009" |
f |
Full date/time pattern |
"Sunday, August 09, 2009 2:44 PM" |
F |
Full date/time pattern |
"Sunday, August 09, 2009 2:44:01 PM" |
g |
General date/time pattern |
"8/9/2009 2:44 PM" |
G |
General date/time pattern |
"8/9/2009 2:44:01 PM" |
t |
Short time pattern |
"2:44 PM" |
T |
Long time pattern |
"2:44:01 PM" |
The following table describes the custom date/time format specifiers and the results they produce.
Format |
Description |
d |
Displays the current day of the month, measured as a number between 1 and 31, inclusive. If the day is a single digit only (1-9), then it is displayed as a single digit. |
dd |
Displays the current day of the month, measured as a number between 1 and 31, inclusive. If the day is a single digit only (1-9), it is formatted with a preceding 0 (01-09). |
ddd |
Displays the abbreviated name of the day. |
dddd |
Displays the full name of the day. |
f or F |
Displays the most significant digit of the seconds fraction. |
h |
Displays the hour in the range 1-12. If the hour is a single digit (1-9), it is displayed as a single digit. |
|
hh |
Displays the hour in the range 1-12. If the hour is a single digit (1-9), it is formatted with a preceding 0 (01-09). |
|
H |
Displays the hour in the range 0-23. If the hour is a single digit (1-9), it is displayed as a single digit. |
|
HH |
Displays the hour in the range 0-23. If the hour is a single digit (1-9), it is formatted with a preceding 0 (01-09). |
|
m |
Displays the minute in the range 0-59. If the minute is a single digit (0-9), it is displayed as a single digit. |
|
mm |
Displays the minute in the range 0-59. If the minute is a single digit (0-9), it is formatted with a preceding 0 (01-09). |
|
M |
Displays the month, measured as a number between 1 and 12, inclusive. If the month is a single digit (1-9), it is displayed as a single digit. |
|
MM |
Displays the month, measured as a number between 1 and 12, inclusive. If the month is a single digit (1-9), it is formatted with a preceding 0 (01-09). |
|
MMM |
Displays the abbreviated name of the month. |
|
MMMM |
Displays the full name of the month. |
|
s |
Displays the seconds in the range 0-59. If the second is a single digit (0-9), it is displayed as a single digit only. |
|
ss |
Displays the seconds in the range 0-59. If the second is a single digit (0-9), it is formatted with a preceding 0 (01-09). |
|
t |
Displays the first character of the A.M./P.M. designator. |
|
tt |
Displays the A.M./P.M. designator. |
|
y |
Displays the year as a maximum two-digit
number. The first two digits of the year are omitted. If the year
is a single digit (1-9), it is displayed as a single |
|
yy |
Displays the year as a maximum two-digit
number. The first two digits of the year are omitted. If the year
is a single digit (1-9), it is formatted with a |
|
yyyy |
Displays the year, including the century. If the year is less than four digits in length, then preceding zeros are appended as necessary to make the displayed year four digits long. |
|
|
z |
Displays the time zone offset for the system's
current time zone in whole hours only. The offset is always displayed
with a leading sign (zero is displayed as "+0"), indicating
hours ahead of Greenwich mean time (+) or hours behind Greenwich
mean time (-). The range of values is 12 to +13. If the offset
is a |
|
zz |
Displays the time zone offset for the system's
current time zone in whole hours only. The offset is always displayed
with a leading or trailing sign (zero is |
offset is a single digit (0-9), it is formatted with a preceding 0 (01-09) with the appropriate leading sign.
zzz |
Displays the time zone offset for the system's
current time zone in hours and minutes. The offset is always displayed
with a leading or trailing sign (zero is |
: |
Time separator. |
/ |
Date separator. |
Examples of use:
Format("{0:d MMM yyyy}", DateTime.Now) = "9 Aug 2009" Format("{0:MM/dd/yyyy}", DateTime.Now) = "08/09/2009" Format("{0:MMMM, d}", DateTime.Now) = "August, 9" Format("{0:HH:mm}", DateTime.Now) = "16:07" Format("{0:MM/dd/yyyy hh:mm tt}", DateTime.Now) = "08/09/2009 04:07 PM"
Function |
Parameters |
Return value |
FormatCurrency |
object value |
string |
Formats the specified value as a currency, using the Windows regional settings.
Example:
FormatCurrency(1.25) = "$1.25"
Function |
Parameters |
Return value |
FormatCurrency |
object value, |
string |
Formats the specified value as a currency. The "decimalDigits" parameter indicates how many places are displayed to the right of the decimal.
Example:
FormatCurrency(1.25, 1) = "$1.3"
Function |
Parameters |
Return value |
FormatDateTime |
DateTime value |
string |
Formats the specified value as a date/time, using the Windows regional settings. This function does not include neutral values in the resulting string.
Example:
FormatDateTime(#1/1/2009#) = "01/01/2009"
FormatDateTime(#1/1/2009 1:30#) = "01/01/2009 1:30:00 AM" FormatDateTime(#1:30#) = "1:30:00 AM"
Function |
Parameters |
Return value |
FormatDateTime |
DateTime value, |
string |
Formats the specified value as a date/time, using the named format specified in the "format" parameter. The valid values for this parameter are:
"Long Date"
"Short Date"
"Long Time"
"Short Time"
Example:
FormatDateTime(#1/1/2009 1:30#, "Long Date") = "Thursday, January 01, 2009" FormatDateTime(#1/1/2009#, "Short Date") = "01/01/2009" FormatDateTime(#1:30#, "Short Time") = "01:30 AM" FormatDateTime(#1:30#, "Long Time") = "1:30:00 AM"
Function |
Parameters |
Return value |
FormatNumber |
object value |
string |
Formats the specified value as a number, using the Windows regional settings.
Example:
FormatNumber(1234.56) = "1,234.56"
Function |
Parameters |
Return value |
FormatNumber |
object value, |
string |
Formats the specified value as a number. The "decimalDigits" parameter indicates how many places are displayed to the right of the decimal.
Example:
FormatNumber(1234.56, 1) = "1,234.6"
Function |
Parameters |
Return value |
FormatPercent |
object value |
string |
Formats the specified value as a percent, using the Windows regional settings.
Example:
FormatPercent(0.15) = "15.00%"
Function |
Parameters |
Return value |
FormatPercent |
object value, |
string |
Formats the specified value as a percent. The "decimalDigits" parameter indicates how many places are displayed to the right of the decimal.
Example:
FormatPercent(0.15, 0) = "15%"
Function |
Parameters |
Return value |
ToBoolean |
object value |
bool |
Converts the specified value to boolean.
Example:
ToBoolean(1) = true
ToBoolean(0) = false
Function |
Parameters |
Return value |
ToByte |
object value |
byte |
Converts the specified value to byte.
Example:
ToByte("55") = 55
Function |
Parameters |
Return value |
ToChar |
object value |
char |
Converts the specified value to char.
Example:
ToChar(65) = 'A'
Function ToDateTime |
Parameters object value |
Return value DateTime |
Converts the specified value to date/time.
Example:
ToDateTime("1/1/2009") = #1/1/2009#
Function |
Parameters |
Return value |
ToDecimal |
object value |
decimal |
Converts the specified value to decimal.
Example:
ToDecimal(1) = 1m
ToDecimal("1") = 1m
Function ToDouble |
Parameters object value |
Return value double |
Converts the specified value to double.
Example:
ToDouble(1) = 1
ToDouble("1") = 1
Function |
Parameters |
Return value |
ToInt32 |
object value |
int |
Converts the specified value to int.
Example:
ToInt32(1f) = 1
ToInt32("1") = 1
Function |
Parameters |
Return value |
ToRoman |
object value |
string |
Converts the specified numeric value to its roman representation. The value must be in range 1-3998.
Example:
ToRoman(9) = "IX"
Function |
Parameters |
Return value |
ToSingle |
object value |
float |
Converts the specified value to float.
Example:
ToSingle(1m) = 1f
ToSingle("1") = 1f
Function |
Parameters |
Return value |
ToString |
object value |
string |
Converts the specified value to string.
Example:
ToString(false) = "False"
ToString(DateTime.Now) = "08/09/2009 4:45:00 PM"
Function |
Parameters |
Return value |
ToWords |
object value |
string |
Converts the specified currency value to words.
Example:
ToWords(1024.25) = "One thousand and twenty-four dollars and 25 cents"
Function |
Parameters |
Return value |
ToWords |
object value, |
string |
Converts the specified currency value to words. The "currencyName" parameter indicates the currency. Valid values for this parameter are:
"USD"
"EUR"
"GBP"
Example:
ToWords(1024.25, "EUR") = "One thousand and twenty-four euros and 25 cents"
Function |
Parameters |
Return value |
ToWords |
object value, |
string |
Converts the specified integer value to words. The "one" parameter contains the name in singular form; the "many" parameter contains the name in plural form.
Example:
ToWords(124, "page", "pages") = "One hundred and twenty-four pages" ToWords(1, "page", "pages") = "One page"
Function |
Parameters |
Return value |
ToWordsEnGb |
object value |
string |
Converts the specified currency value to words in Great Britain english. There are the following differences between this function and ToWords:
the GBP currency is used by default;
different words used when converting milliards and trilliards.
Example:
ToWordsEnGb(121) = "One hundred and twenty-one pounds and 00 pence"
Function |
Parameters |
Return value |
ToWordsEnGb |
object value, |
string |
Converts the specified currency value to words in Great Britain english. The "currencyName" parameter indicates the currency. Valid values for this parameter are:
"USD"
"EUR"
"GBP"
Example:
ToWordsEnGb(1024.25, "EUR") = "One thousand and twenty-four euros and 25 cents"
Function |
Parameters |
Return value |
ToWordsEnGb |
object value, |
string |
Converts the specified integer value to words in Great Britain english. The "one" parameter contains the name in singular form; the "many" parameter contains the name in plural form.
Example:
ToWordsEnGb(124, "page", "pages") = "One hundred and twenty-four pages" ToWordsEnGb(1, "page", "pages") = "One page"
Function ToWordsRu |
Parameters object value |
Return value string |
Converts the specified currency value to words in russian.
Example:
ToWordsRu(1024.25) = "Одна тысяча двадцать четыре рубля 25 копеек"
Function |
Parameters |
Return value |
ToWordsRu |
object value, |
string |
Converts the specified currency value to words in russian. The "currencyName" parameter indicates the currency. Valid values for this parameter are:
"RUR"
"UAH"
"USD"
"EUR"
Example:
ToWordsRu(1024.25, "EUR") = "Одна тысяча двадцать четыре евро 25 евроцентов"
Function |
Parameters |
Return value |
ToWordsRu |
object value, |
string |
Converts the specified integer value to words in russian. The "male" parameter indicates the gender of the name. The "one", "two" and "five" parameters contain a form of the name used with "1", "2" and "5" numbers.
Example:
//
the "страница" wordis of female genter, male = false
ToWordsRu(122, false, "страница" "страницы", "страниц",)
=
"сто двадцать две страницы"
//
the "лист" word is of male gender, male = true
ToWordsRu(122, true, "лист", "листa", "листов")
=
"сто двадцать два листа"
Function |
Parameters |
Return value |
Choose |
double index, |
object |
Returns an element of the "choice" array with the index specified in the "index" parameter. The first array element has 1 index.
Example:
Choose(2, "one", "two", "three") = "two"
Function |
Parameters |
Return value |
IIf |
bool expression, |
object |
Returns the "truePart" value, if the "expression" is true. Otherwise, returns the "falsePart"
value.
Example:
IIf(2 > 5, "true", "false") = "false"
Function |
Parameters |
Return value |
Switch |
params object[] expressions |
object |
The argument supplied to expressions consists of paired expressions and values. The Switch function evaluates the odd-numbered expressions from lowest to highest index, and returns the even-numbered value associated with the first expression that evaluates to True.
Example:
// returns one of the following values - "acyrillic greater than 0", // "acyrillic less than 0", "acyrillic equals to 0", depending on "a" value
Switch(
a > 0, "acyrillic greater than 0",
a < 0, "acyrillic less than 0",
a == 0, "acyrillic equals to 0")
In many reports, we may need to show some total information: sum of the group, number of rows in the list, and many others. FastReport uses totals to perform this task. For the total, you need to indicate the following parameters:
The total function type;
The expression, which is supposed to be calculated. For the "Count" function, you do not need to indicate the expression;
The condition. The function will be calculated if the condition is met. It's not obligatory to set up the condition.
The data band, for which the function will be processed;
The band, in which the total value will be printed.
The list of total functions is given below:
Function |
Description |
Sum |
Calculates the sum of the expression. |
Min |
Calculates the minimum value of the expression. |
Max |
Calculates the maximum value of the expression. |
Average |
Calculates the average value of the expression. |
Count |
Returns the number of rows. |
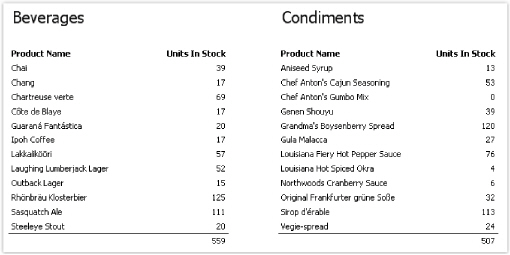
We will look at using the total function as an example. Let us create the "master-detail" report that uses two tables - "Categories" and "Products":
The prepared report will be as follows:

Let us add total in this report which will be printing the total quantity of units in stock for each category - sum of "UnitsInStock" data column. Total will be printed in the "Data Footer" band.
To print total value, you need to create it first. For this, press "Action" button in the "Data" window, and choose the "New total" item. Another method - right click the "Totals" element in data tree and choose "New total" menu item. You will see the total editor window.
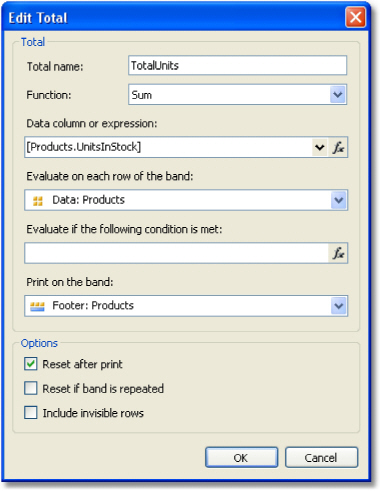
First of all, you will be asked to indicate total's name. You will be referring to the total by its name, so name the total in such a way that it will be easy to understand as what it calculates. Let us call our total as "TotalUnits".
Then we choose the "Sum" function for the total.
Now we need to indicate data range for which total will be calculated. For that in "Evaluate on each row of the band:" field, we choose the "Data" band in which a list of products is printed. In the "Print on the band:" field we choose a band in which total will be printed - that is, the "Data Footer" band.
Close editor by pressing OK button. You will see the new total appears in the "Data" window. Now you can drag it into the report:
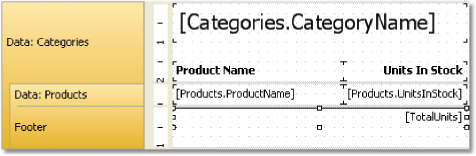
When we run the report, we will see the following:
In the previous example, total was calculated for all data rows. We can limit this range by indicating the condition in the total editor. Total will be calculated for only those rows, whose condition returns true.
For example, we can set the following conditions:
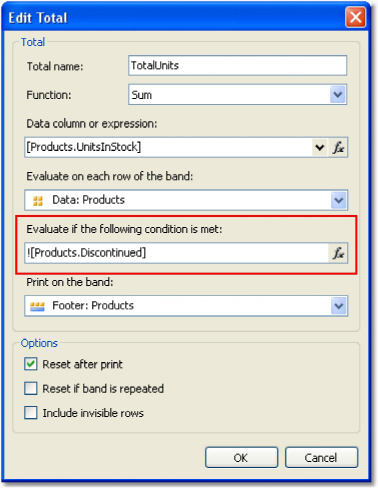
This will mean that, total should be calculated for those products, whose "Discontinued" flag is not set.
In our example totals were reset after printing the "Data Footer" band. This occurred because we indicated in total editor that it is necessary to reset the total after printing it. As a result, each category printed its own total values.
If we uncheck the "Reset after print" checkbox, the total will not be reset after printing. This is what is called running total.
If you need to print two types of totals at the same time - ordinary totals and running totals -create one more total with similar settings and uncheck the "Reset after print" flag.
In order create a total which will be printed on the page footer, you will have the indicate page footer in the "Print on the band:" field.
Printing the total in the header
Usually you will print total values on the footer bands (such as data footer, group footer, etc). It's a natural printing order because when you print the total, its value is properly calculated and is ready to use. However, in some cases, you would need the total to be printed on the header (for example, on the group header). If you try to do this, you will see a zero value. At this moment, when you print a total, it is not calculated yet.
To solve this problem, FastReport has a feature called "delayed print". The "Text" object has a property called "ProcessAt" which can have one of the following values:
Value |
Description |
Default |
The default printing mode. This is the default value. |
ReportFinished |
The object's value will be calculated at the end of the report. |
ReportPageFini |
The object's value will be calculated when all bands in the page will be finished. |
PageFinished |
The object's value will be calculated at the end of the page. |
ColumnFinished |
The object's value will be calculated at the end of the column. |
DataFinished |
The object's value will be calculated at the end of the data band (when its footer is printed). |
GroupFinished |
The object's value will be calculated at the end of the group (when its footer is printed). |
Let's look at how it works. Put the "Text" object which prints the total, on the group header. Set the "ProcessAt" property of the "Text" object to "GroupFinished":

When you run the report, FastReport will do the following:
it will print the group header. The total value will be printed as 0 (wrong), but FastReport will remember this object to process it later;
it will print all data rows;
it will print the group footer. At this moment, FastReport will take the object that was printed in the group header, and process it again to print the correct total value.
The prepared report will be as follows:
Using other values of the "ProcessAt" property, you may print the report total in the report title (set ProcessAt = ReportFinished), or print the page total in the page header (set ProcessAt = PageFinished).
The delayed print feature will not work if you turn on the report file cache ("Report/Options..." menu, "Use file cache" checkbox).
You can define parameters in a report. Parameter is a variable, the value of which can be defined both in a report itself and outside of it (a program, calling a report can transfer parameters values into it. See details in "Programmer's manual"). A parameter can be used in expressions and be displayed in report objects like the "Text" object.
Most common methods of using parameters:
data filtering by condition set in a parameter;
printing parameter value in a report.
A parameter has the following properties:
Property |
Description |
Name |
Parameter's name can have any symbols except dot ".". |
DataType |
Parameter data type. |
Expression |
Expression which returns parameter's value. More details about expressions can be found in the "Expression" chapter. This expression will be processed when calling a parameter. |
Value |
Parameter value. This property is not available in the designer and can be filled programmatically. |
You have to set up "Name" and "DataType" properties. The "Expression" property can be left empty. In this case parameter's value should be passed programmatically.
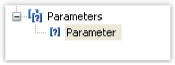
To create a parameter, select the "Parameters" element in the "Data" window, right-click it and choose the "New parameter" item in a context menu:
Press F2 and give a parameter name, then go to the "Properties" window and set the parameter's "DataType" property.
Parameters can be nested. To create a nested parameter, select a parent parameter, right-click it and choose the "New parameter" item in a context menu:
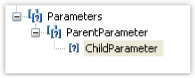
You can refer to both, parent parameter and nested one. Nesting level is not limited.
You can refer to a parameter from an expression using square brackets:
[Parameter name]
To a nested parameter you need to refer using this method:
[Parent parameter.Child parameter]
Since a parameter has got a definite type (it is given in the DataType property), then with parameters, you can perform those actions which are allowed for data type. So, string type parameters can be used in an expression the following way:
[StringParameter].Substring(0, 2)
Let us see one example of using parameters. Assuming we have a report which prints "Employees" table. We want to modify the report to print information about an employee with an indicated number. To do this, we need to filter the data on the "EmployeeID" data column. Create a parameter with "EmployeeID" name. Indicate parameter's type - Int32, as exactly this type has the "EmployeeID" data column. To filter an employee with an indicated ID we need to enter "Data" band editor and indicate the following expression in "Filter" tab:
[Employees.EmployeeID] == [EmployeeID]
To pass parameter value from your program to the report, use the following code:
report1.SetParameterValue("EmployeeID", 2);