If a Tool Inventory (*.inv) is selected, the field list shown above displays.
When a Machine (*.mac) is chosen, the field list shown on the left displays.
The Export Tool List option allows you to export the tool information in the turret to the machine file or an entire tool inventory to a text format or Microsoft Excel (*.xls) worksheet format.
Notes:
You can export the tool information in the turret, in the machine file or the tool inventory as a text file, or export it to the Microsoft Excel (*.xls) worksheet format.
When values in the selected fields are empty or contain null values, the Export Utility substitutes a blank delimiter.
If you export just the tool inventory, the Die Clearances will only export up to four angles. This is different from the available angles that pertain to the turret setup in the machine (*.mac) file.
The Angle is the loaded or keyed angle for the tool in the station. This is not the same as the “Additional Angles.” The machine file will only pass a total of seven angle values.
To export the tool list:
1 Select Export Tool List from the File menu. The Open dialog box appears
2. If necessary, select either Machines (*.mac) or Tool Inventories (*.inv) from the Files of type: list. The dialog box lists the machine files or tool inventories in the default directories.
3. Navigate through the list and select the machine file or tool inventory you want to export.
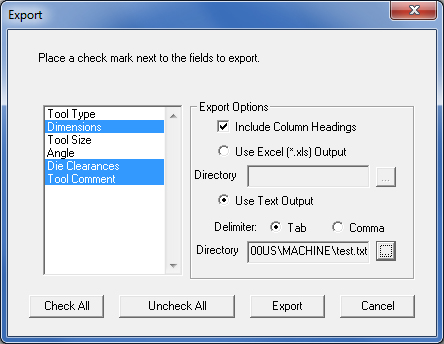
4. Click Next > in the Open dialog box. The Export dialog box appears. The dialog box lists the fields in the scroll list to the left.
|
If a Tool Inventory (*.inv) is selected, the field list shown above displays. When a Machine (*.mac) is chosen, the field list shown on the left displays.
|
5. To select a field for export, click on it to highlight the field. Select multiple fields by clicking on each field. Click Check All to select all the fields for export, or Uncheck All to remove all the fields from the export.
6.#160;Select Include Column Headings under Export Options if you want to include the descriptive column headings in the output.
7. If you want to export the data to Microsoft Excel (*.xls) format, select Use Excel (*.xls) Output under Export Options. If you want to export the data to the ASCII text format, select Use Text Output under Export Options, and then select either Tab or Comma next to Delimiter.
8. Click the active Browse button after Directory. The Save As dialog box appears.
9. Type a name in the File name: field. You need only type the file name. The Export Utility will automatically add the *.txt or *.xls filename extension. Click Save. You return to the Export dialog box, and the directory automatically appears in the Directory field.
10. Click the Export button. The data is parsed according to the export options that you selected. The exported data appears in the Notepad window or in a Microsoft Excel worksheet.
11. Select another machine file or tool inventory in the Open dialog box to export, or click Cancel to exit the Export Utility.