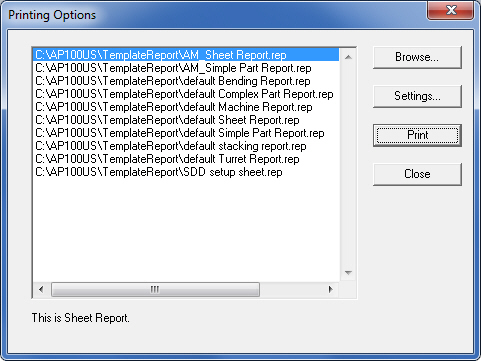
To print from a default or custom-formatted template, select Print Template Style from the File menu or click on the Print Template Style icon. The program will open the Printing Options dialog shown here -
AP100US allows Sheet, Part, Machine and Turret reports to printed. To print the user must choose the correct report. For example, to print a Sheet report, the AP100US program must be in Sheet view and a Sheet report must be highlighted (default Sheet Report is selected here). If an incorrect choice is made, the program will display a warning such as -

Template reports have the filename extension of *.rep and by default are stored in the \TemplateReport folder in the AP100US installed folder on the local hard drive. Use the options in this window to print a simple part or sheet layout. To delete a template, go to the TemplateReport folder and delete manually.
AP100US allows users to create and save customized report templates.
(See Template Report Design for more information.)
Note: You must install your printer or plotter drivers before you can print or plot parts, and connect the appropriate printing device. For a plotter, you must specify the paper size and the pens. Please refer to your Windows documentation for more information.
Browse
Click the Browse button to navigate to an alternate drive or folder. An Open window will appear and list the template report (*.rep) files in the default \TemplateReport directory.
|
|
Option |
Description |
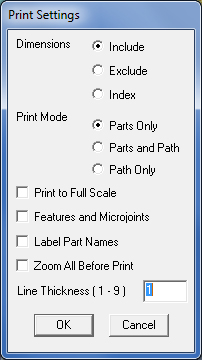
Dimensions |
Determines how the system prints the dimensions. There are three options: |
Include |
The system includes the part or sheet dimensions. |
Exclude |
The system omits the part or sheet dimensions. |
Index |
The Index option is used primarily by FabriVISION users. This option provides the numbering key for inspection reports. |
Note: |
If you are printing or plotting the sheet, only the sheet dimensions are listed when you select Include. If you are printing or plotting a part, only the part dimensions are listed when you select Include. |
Print Mode |
The three print mode options allow you to specify whether your print job includes only the parts, the parts and cutting path, the punching path, or the path only. |
Parts Only |
Prints only the parts. |
Parts and Path |
This option is available when you are printing the sheet. It prints the parts and the sequenced cutting or punching path. |
Path Only |
This option is available when you are printing the sheet. It prints only the cutting or punching path for the sequenced patterns. |
Print to Full Scale |
Select this option if you want to print or plot to full scale. |
Features and Microjoints |
Select this option if you want to print the microjoints, corner features and condition nodes. |
Label Part Names |
This option allows you to automatically print numbered labels and a corresponding list of part file names when you print from the SHEET View, enabling you to determine what parts occupy a nested sheet. |
Zoom all Before Print |
If an entire sheet is displayed, when you check this option the final printed image will only include a single part from that same sheet. |
Line Thickness |
This allows you to set the thickness of the line. |
Click the Print button to begin printing.
Close
Click Cancel to exit without printing.