
Click Export to save edited XLS and CSV files to the Material folder (or to any desired directory).
When the Export button is clicked, this Save As window will appear -
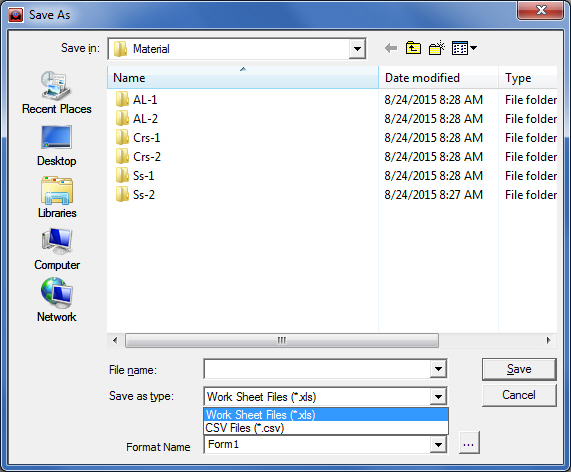
The user must then select XLS or CSV from the Save as type pull-down list.
In the Format field, select the format type to save with the file, and then click Save. Assign a new name to the file, or overwrite the current file. Any other changes must be done in the Option window.
To
edit and save other XLS file settings, click the settings button
![]() to
open the Option window shown here.
to
open the Option window shown here.
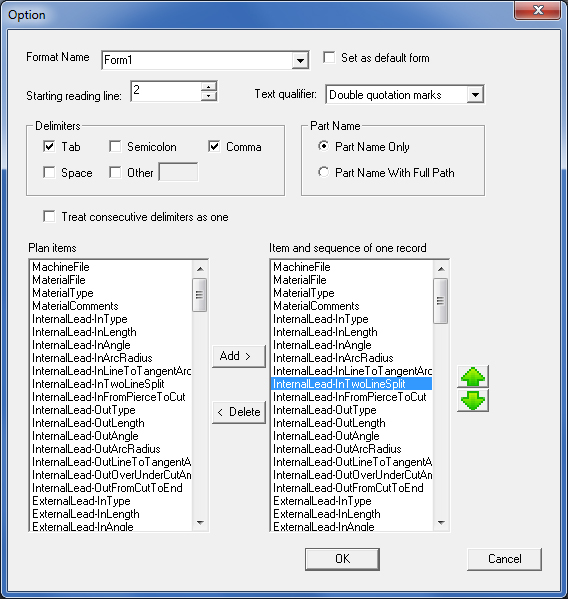
In the Option window the user must decide what information the exported file will be saved with by Adding or Deleting items from the Item and sequence of one record text box.
The items shown in this Option window are for Material files. Tool Inventory, Sheet and Part have different items.

The XLS file type record items (shown on the left) become the column headers in the Excel file
Format
Name
A Format Name in an XLS file decides which Plan items to use as column headers in the file itself and in which order they will appear.
Select one of the existing Formats available in this drop-down, or create a new Format Name by entering a unique name in the field, and then building an Item and sequence of one record list by adding items from the Plan Items list, and then adjusting their order as desired.
Note: A new format name may be created and saved by clicking OK. However, to insert the new format name (or any changes) into an XLS file requires that the Save button in the Save As dialog be clicked.
See Plan Items below for more information.
Set as default form
Checking this option ON will make the current form in the Format Name field the default. Even with a default form selected, the user may still select other forms available on the pull-down menu.
Select which line the program will begin reading the .xls or .cvs file on. The program defaults to line 2 here, as that line typically displays the column headers. Keep that setting or select another.
Text
qualifier
This option allows the user to select the punctuation marks used to qualify items. Choices available are “Double quotation marks”, “Single quotation marks” and “none”.
Delimiters
Delimiters are used to separate string formats into unique data entries. For example, the string Demo; 15; 2011-11-16 uses semicolons to divide unique values/entries.
Available delimiters are Tab, Semicolon, Comma, Space and Other (user-specified).
Part Name
Part Name Only
Allows the user to specify that the file's PartName data column will contain the Part Name only.
Part Name with Full Path
Allows the user to specify that the file's PartName data column will contain the Part Name in addition to the part's full path.
The full path will use the Import files Directory to pull the Part into the Schedule list.
Treat consecutive delimiters as one
If more than one of a certain delimiter type is entered in a row, checking this box allows the program to treat them as one delimiter.
These are available plan items (column information headers) that can be stored in an xls file. Select items to appear in the record by highlighting an item, and then clicking Add to insert the item into the list on the right (multiple-selection is supported).
Notes:
Plan items selected here are used by are used by other systems’ ERP or MRP information.
Part Name is mandatory and can’t be deleted; without it XLS/CSV/ files can’t be imported.
Item
and sequence
of
one
record
Selected items from the Plan items list appear here. Delete unwanted entries by highlighting, and then clicking Delete.
Note: It's best to have at least three or four items in the record.
![]()
The order (top to bottom) of the items shown in this pane, will appear from left to right in the saved xls file. Highlight an item and then click the green up/down buttons to move it to the desired order in the list.
OK
/ Cancel
Click OK to save changes in the option panel. To save the changes to a file, click OK here and then Save in the Save As window. Click Cancel to close the dialog without saving.