Use the Add Cutting Condition and Edit Cutting Condition options on the Cut Condition submenu respectively to add cutting conditions to the paths and modify existing conditions. Condition nodes allow you modify a cutting condition along a path with breaking the path or lifting the cutting head of the machine. For parts, nodes are added in Part view and saved with the sheet. You can also place condition nodes on sheet patterns.
![]()
To apply a cutting condition along a path, select Add Cutting Condition and when the Cutting Conditions flyout window appears, select the condition(s) you want to define for the node(s). For more info see Adding Condition Nodes.
See also on this page Copy Conditions To Node, Copy To Pattern and Copy To All Like Patterns.
![]()
To modify a cutting condition along a path, select Edit Cutting Condition and move into the work area. The pointer snaps between the condition nodes. When you click a condition node, the Cutting Conditions window appears. You can then modify the cutting conditions as needed. For more info see Editing Condition Nodes and Deleting Condition Nodes.
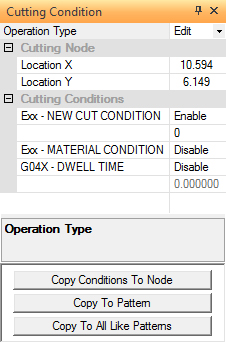
Whenever you add or edit cutting conditions, the Cutting Condition flyout window appears. The window contains options that allow you to add, edit or delete cutting conditions. |
|
Option |
Description |
Operation Type |
There are three options you can select from the drop-down list: Add, Edit and Delete. |
Add |
The Add option will appear by default when the system is in Add Cutting Condition mode. Select Add from the Operation Type drop-down list if you want to add cutting conditions. See Adding Condition Nodes. |
Edit |
The Edit option will appear by default when the system is in Edit Cutting Condition mode. Select Edit from the Operation Type drop-down list if you want to modify the cutting condition. See Editing Condition Nodes. |
Delete |
Select Delete from the Operation Type drop-down list if you want to remove condition nodes. You can then move into the work area and select those condition nodes that you want to remove. See Deleting Condition Nodes. |
Cutting Node |
This section of the Cutting Condition window displays the coordinate information for the selected condition node. |
Location X |
The Location X and Location Y fields display the horizontal and vertical coordinates of the condition node, measured from the Part Origin or Reference Point. New Location buttons appear to the right of the fields when you select the labels, allowing you to modify the coordinates of the condition node. |
Location Y |
The actual conditions supported by the currently loaded machine driver appear along the left-hand side in this section of the window. |
Cutting Conditions |
To define a cutting condition for a path, move into the Cutting Condition flyout window and select either Enable or Disable from the drop-down list that follows the descriptive label. Some options require a value. The input field for a condition node option appears immediately below the drop-down list. For example, in the illustration below, the Enable option was selected for DWELL TIME G04 and a pause value specified in the field immediately below the drop-down list.
|
Copy Conditions To Node |
Click this button during an interactive edit to copy conditions to a node. Copy Conditions To Node |
Copy To Pattern |
Click this button during an interactive edit to copy conditions to a pattern. Copy To Pattern. |
Copy To All Like Patterns |
Click this button during an interactive edit to copy conditions to identical patterns. Copy To All Like Patterns. |
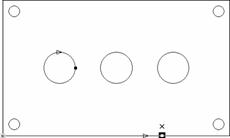
The Add mode allows you to place additional condition nodes on a path. Open the Cutting Condition window and then select Add from the Operation Type drop-down menu to activate the interactive mode. Enable the cutting condition(s) in the list you want to define for the node(s). If necessary, specify a value for the condition after you enable it.
Note: Do not use the right mouse button to snap. For condition nodes, the right mouse button cancels the selection of the current pattern, allowing you to select another pattern.
Move into the work area and click the path where you want to place the condition node. You can define a step value and use the <Arrow> keys, or type coordinates to set the location.
As
you move the node along the path, the pointer hesitates as it encounters
the snap points. If needed, you can place the condition node at a snap
point. Click
the left mouse button again or press <Enter> to place the condition
node.
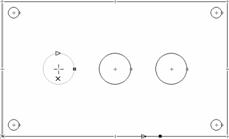
The Edit mode allows you to edit an existing condition node on a path. Open the Cutting Condition window and then click Edit to activate the interactive mode. Enable the cutting condition(s) in the list you want to define for the node(s). If necessary, specify a value for the condition after you enable it. Move into the work area. The pointer bounces among any existing condition nodes. Move the pointer onto the node’s location and click the left mouse button to update the condition(s) for the node(s).
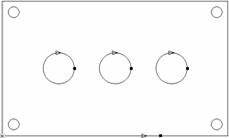
The Delete mode allows you to remove condition nodes. Open the Cutting Conditions window and then select Delete from the Operation Type drop-down menu. Move into the work area. The pointer bounces among the existing nodes. To delete a node, move the pointer onto it and click the left mouse button. Delete mode remains active until you make an alternate selection.
|
|
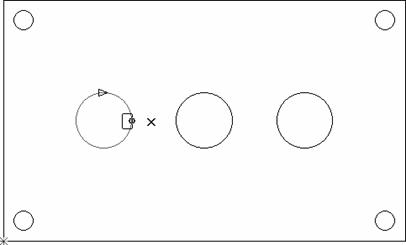
Selecting the condition node. |
Condition node removed from path. |
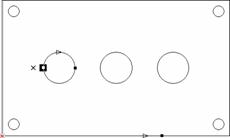
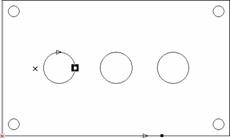
This option allows you to replicate conditions from one node to another existing condition node. Open the Cutting Conditions window. Select Edit from the Operation Type drop-down menu to activate the interactive mode. Move into the work area. Click the source node that contains the conditions you want to copy. Click Copy Conditions To Node. Move into the work area, and place the pointer onto the destination node that should receive the conditions and click again.
|
|
Selecting the source node having the conditions. |
Selecting the destination node. |
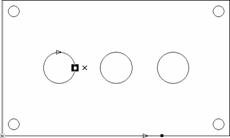
The Copy To Pattern option allows you to copy all the nodes on one pattern to another pattern of the same type (and any size). Open the Cutting Conditions window. Select Edit from the Operation Type drop-down menu to activate the interactive mode. Move into the work area and click the pattern having the condition node(s) you want to copy. Select Copy To Pattern. The system prompts you to select the destination pattern for the condition nodes. Move the pointer onto the next pattern and click it.
|
|
Activate
Edit mode and then select the pattern |
Select Copy
To Pattern, move the pointer |
This option allows you to copy all the nodes from one pattern, and automatically place them on all identical patterns. Open the Cutting Conditions window. Select Edit from the Operation Type drop-down menu to activate the interactive mode. Move into the work area and click the pattern containing the node(s) you want to copy. Click Copy To All Like Patterns.
The system prompts you to confirm the action. Press <Y> for Yes or <N> for No. If you confirm the action, the node(s) are copied to all the identical patterns.
|
|
Select the
pattern having the |
If you press
<Y> to confirm, the condition node(s) |