If you know the three points of the arc, but are unsure of the radius, the Arc 3 Points option allows you to draw the arc around the three known points. You can place the points as you draw the arc or use points already drawn on the part. Once you complete the arc, the system calculates the correct center point and radius in the property window. Note: To precisely position patterns try the Coordinates feature in the Draw menu. |
|
To draw a three-point arc, select Arc 3 Points and move into the work area. The system prompts you for the first, second and third points. As you move the crosshair, the arc stretches behind it, always passing through the first and second points and repositioning itself to form an arc ending at the current position of the crosshair. |
|
|
Option |
Description |
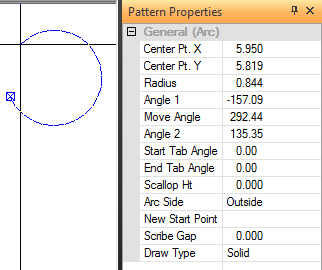
General (Arc 3 Points) |
|
Center Pt. X |
The X coordinate for the center point of the arc, measured from the reference point of the part. |
Center Pt. Y |
The Y coordinate for the center point of the arc, measured from the reference point of the part. |
New Center Point Buttons |
Click the New Center Point buttons to reposition the center point on the part. |
Radius |
The radius of the arc. |
Angle 1 |
The starting angle for the arc. |
New Angle 1 Button |
Click the New Angle 1 button to define a new starting angle for the arc. |
Move Angle |
The moving angle for the arc. The measurement is the difference between Angle 2 (ending angle) and Angle 1 (starting angle). It indicates the distance the arc travels. |
New Move Angle Button |
Click the Move Angle button to define a new moving angle for the arc. |
Angle 2 |
The ending angle for the arc. |
Start Tab Angle |
This field allows you to define a tab, measured in degrees, on the starting end of the arc. |
End Tab Angle |
This field allows you to define a tab, measured in degrees, on the ending point of the arc. |
Scallop Ht |
Use this field to control the scallop height on a specific angle. The scallop height is the distance formed by the scallop of nibbling tools. |
Arc Side |
Select either Inside, Outside or On after Arc Side to specify where the system should cut or punch this arc: Inside the line, Outline the line, or On the line. |
New Start Point Button |
Click the New Start Point button to drag the arc to a new starting point. |